From an idea to artwork on a product
BYOK AI integration
Describe your idea, choose a style and get an image or a set of layers to edit further. Add the result to your product, refine it in 2D and 3D, then save the project or a template for reuse.
BYOK stands for Bring Your Own Key: you connect your own AI provider account to Alter Product. You can generate images with OpenAI or Google Gemini, and the plugin also lets you create compositions with text layers using Anthropic Claude. API calls are billed to your provider account.
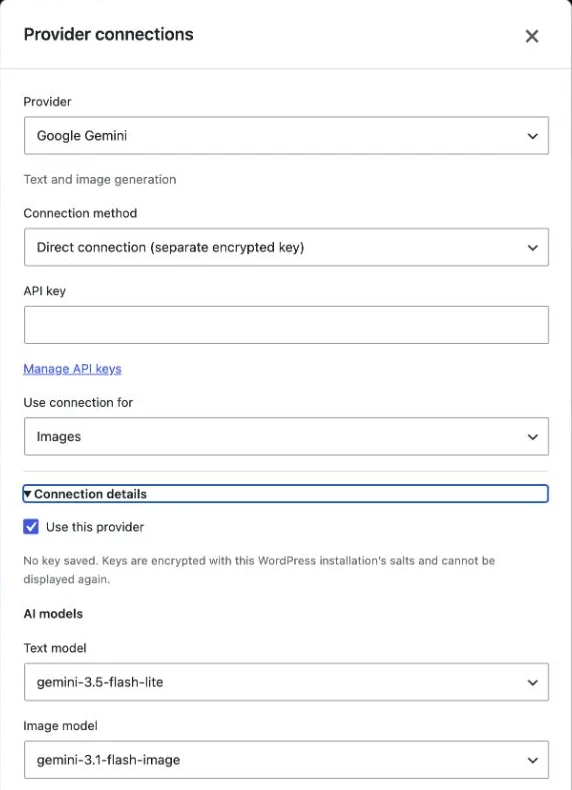
The screenshots show the actual interface in English. The artwork example comes from a recording of work in Alter Product; the WordPress forms show the configuration with no keys entered. Click an image to enlarge it.
Choose a provider and a workflow
A text model helps prepare the composition, while an image model creates the illustration. These are different tasks. The options available depend on the provider, the selected connection and where you are working.
Images, transparent backgrounds and AI detail enhancement.

Images from prompts and a text model for preparing compositions.
OpenAI, Google Gemini and Anthropic Claude
OpenAI supports image generation, transparent backgrounds and Enhance details with AI. Google Gemini generates illustrations from prompts; the current integration does not offer transparent backgrounds or AI detail enhancement for Gemini. You can remove the background from a Gemini image later using the Designer tools.
Anthropic Claude handles text tasks. In the local WordPress Designer, it can prepare a set with text, simple vectors and a QR code when the Image layer is disabled. It does not replace a model that generates raster illustrations.
Which models does the integration include?
The catalog below lists the models supported by the current integration. In the WordPress plugin, you choose the text and image models in Connection details. In the Alter Product app, you choose a connection, and the service configuration assigns the model - the generator window has no separate model selector.
The default OpenAI configuration uses gpt-5.4-mini for text and gpt-image-2.5-sunburst for images. For Gemini, these are gemini-3.5-flash-lite and gemini-3.1-flash-image. Whether you can use a particular model also depends on its availability and the permissions on your API account.
| Provider | Text models | Image models |
|---|---|---|
| OpenAI | gpt-5.4-mini, gpt-4.1-mini, gpt-4.1 | gpt-image-2.5-sunburst, gpt-image-2.5-flare, gpt-image-1.5, gpt-image-1 |
| Google Gemini | gemini-3.5-flash-lite | gemini-3.1-flash-image |
| Anthropic Claude | claude-haiku-4-5, claude-sonnet-4-6 | No image model in this integration |
Connect your own key in the app
Open AI settings, choose a provider and the Image generation use case, then add your API key. An optional name helps distinguish connections, such as a business account and an account for testing ideas. Acknowledge the cost information and select Add key.
When several connections are active, the generator lets you select them by name. In settings, you can also choose a default connection, change its name or key, disable it or delete it. You do not need to add a separate key for prompts to create a layer set containing an image.
Saving a connection does not generate anything. The key is stored encrypted on the server; the interface shows only its final characters. Deleting a connection from Alter Product does not revoke the key in your provider account.
- Open AI settings and choose a provider.
- Name the connection if you want to recognize it easily in the list.
- Select Image generation and enter your own API key.
- Acknowledge the cost information and add the key.
- Open a project in Designer and select AI generator.
Describe your idea and prepare a layer set
The AI generator works in an open Designer project. You can prepare an illustration on its own or combine it with text, simple shapes and a QR code. Choose the settings before generating.
Prompt: subject, composition and details
Describe what the image should show, how the elements should be arranged and which colors should dominate. For a print, specify whether the entire motif should be visible, the space around it and whether to include lettering. The prompt field accepts up to 500 characters.
You can start with an example below the prompt field and adapt it to your product. If you want specific wording, put it in quotation marks and enable the Text layer. Choose a style that matches your description - the style setting takes priority over a conflicting instruction in the prompt.
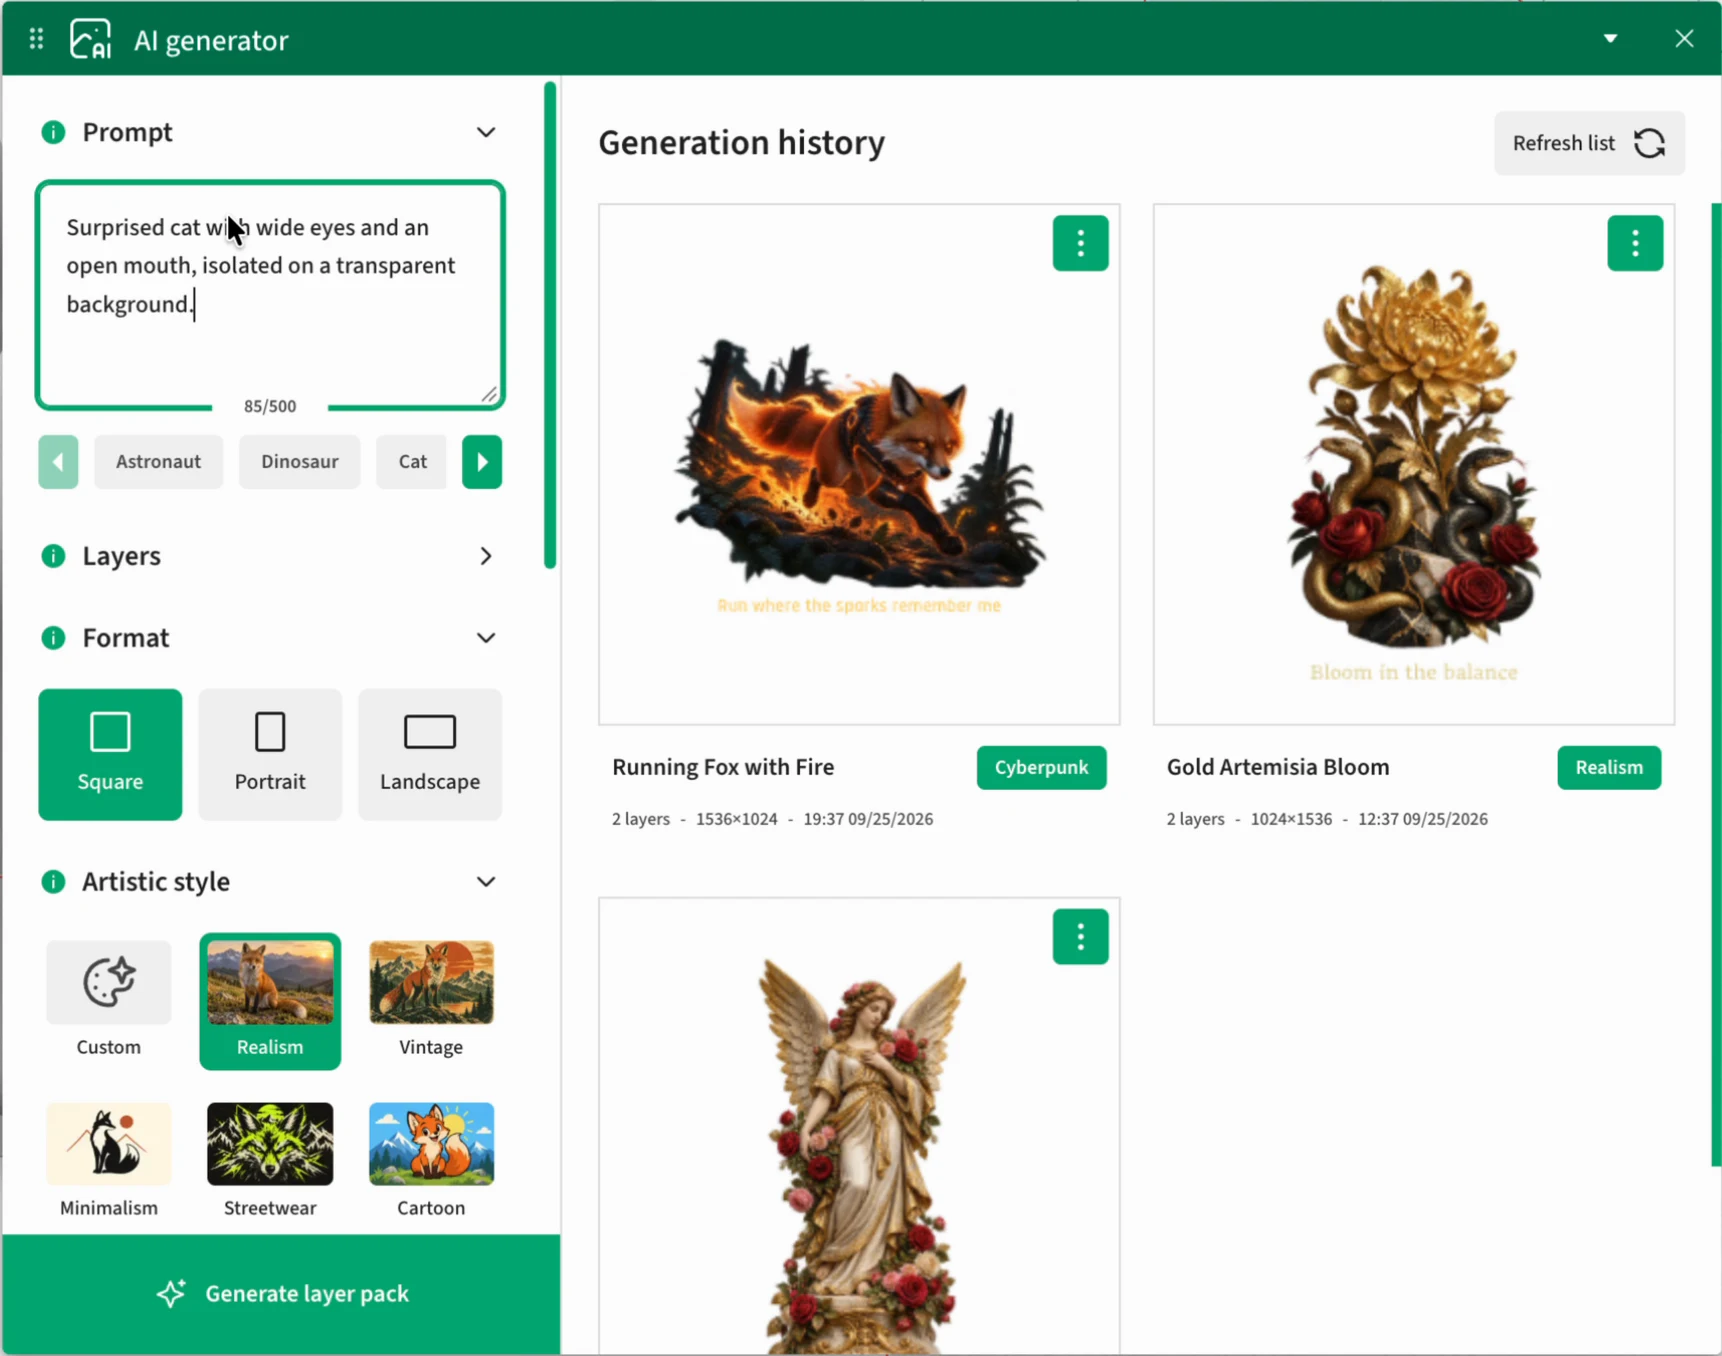
Image, text, simple vectors and QR
Expand Layers and select only the elements you need. Image and Text are enabled initially. For a single illustration, leave only Image enabled. Add the other layer types when you want a composition to refine further.
Text in the image and the Text layer produce different results. The first option allows lettering inside the bitmap. The second creates separate text that you can change later with the text tools. For a slogan you intend to edit, choose the Text layer.
After enabling QR code, enter its content or URL in the dedicated field. A description of the code’s appearance in the prompt is not a substitute for this. After insertion, check the code’s content and scan it in the final design.
- Image: a raster illustration you can edit further with the image tools.
- Text: separate, editable text layers.
- Simple vector: frames, lines and basic shapes for the composition.
- QR code: a code layer with specified content, up to 500 characters in the QR field.
Choose a style, aspect ratio and background
Choose Square, Portrait or Landscape, with aspect ratios of 1:1, 2:3 and 3:2 respectively. Match the format to the print: a vertical motif for the front of a T-shirt, a horizontal composition for a wide product or a square for versatile artwork.
There are 31 preset styles and a Custom style, where you can enter your own description of up to 500 characters. Give a collection a consistent look by using the same style and a similar palette in subsequent prompts.
The background can follow the prompt, use a chosen color or be transparent. Select transparency as a setting when you need just the motif for printing. In the current integration, this option requires OpenAI; for Gemini, choose a background from the prompt or a color. Always review the result before use.
- Realism, Vintage, Minimalism, Streetwear, Cartoon, Watercolor.
- Vector, Line art, Engraving, Woodcut, Screen print, Risograph, Comic halftone.
- Collage, Papercut, Botanical, Folk, Art déco, Bauhaus.
- Psychedelic, Retro 70s, Y2K / Chrome, Synthwave, Cyberpunk, Pixel art.
- Anime, Kawaii, Graffiti, Sticker, Varsity, Lettering and Custom.
Example prompts to get started
Use the descriptions below as a starting point. Set the style, background and layers in the form, and focus the prompt on the motif and composition. These examples do not promise identical results with every generation.
A surprised cat with wide-open eyes, fully visible and centered in the frame. Clear outlines, soft shading and plenty of empty space around it. No lettering or extra objects.
Image; Cartoon style; Portrait format; transparent background with OpenAI.
A botanical composition of fern leaves and wildflowers, in muted green and cream. Illustration above clear lettering reading “GROW AT YOUR PACE”. Lettering as a separate text layer, with space between it and the plants.
Image + Text; Botanical style; Portrait format.
A minimalist label with the text “Explore our collection”, a simple frame and space for a readable QR code. Black elements, an orderly composition and generous spacing.
Text + Simple vector + QR code; Minimalism style. Enter your own collection URL in the QR content field.
Compare results, regenerate and enhance details
Click Generate layer set. The result appears in the history, where you can review it and select it for your project. It is not automatically placed on the product.
History and regeneration
Click a thumbnail to see a larger preview. The result menu contains Copy prompt and Regenerate. Copying lets you return to the description and change the palette, subject or wording, for example, before generating again.
Regenerate creates a new result from the saved settings. It uses the original connection and its current key, so that connection must still be available. This is another request to the provider that may incur a charge, rather than a download of a copy of the previous image.
If a result is partial, check the messages and the layers present. You can use the available elements, but check the lettering, QR code, background and complete composition before saving. The history lets you view and insert saved sets even after the key has been disabled.
Upscale an image for printing
Upscale image prepares a larger version of the bitmap without a new call to the AI provider. In the current implementation, the longer side is doubled, up to a maximum of 4096 px. This feature applies to results that contain an image.
A lighter preview may remain in use on the canvas, while the larger file is used for printing. Separate text, vectors and the layer arrangement remain unchanged. If the result is already in the project, the larger print file can be attached to it.
More pixels do not guarantee recovery of fine details from the original or suitable printing at any size. Check the image at the intended print dimensions and choose the export settings in Printing manager.
Enhance details with AI using instructions
For a supported OpenAI result, choose Enhance details with AI. Enter a Description of changes, such as “refine the fur outlines, preserve the composition and colors”, then start enhancement. The field accepts up to 2000 characters. The image and instructions are sent to the AI provider.
The operation requires the original connection to be active, an available model and a result with a single image. In the app, each further enhancement builds on the last completed revision. In the current WordPress plugin, enhancement from the history card uses the original image. Separate text and vector layers are not part of the bitmap being modified.
AI enhancement can change the appearance and incur another charge. Review the new result, then select it for the project. A visual change does not automatically replace artwork already on the canvas.
| Operation | What it does | New AI call |
|---|---|---|
| Copy prompt | Lets you reuse the description | No |
| Regenerate | Creates a new result from saved settings | Yes |
| Upscale image | Prepares a larger raster for printing | No |
| Enhance details with AI | Changes the image according to your instructions | Yes, OpenAI |
Place the result in your project and continue editing
AI prepares material for use in Designer. You remain in control of the final layout, size, lettering and fit on the product.
Select a result and choose a print placement
Use Select on the result card. The generator window closes, and you choose a position in the print area. You can also drag the thumbnail or preview onto the canvas. You need an open project and a prepared print area.
The set is added to the project as a group of layers. You can still edit the text, simple vectors and QR code; the generated illustration remains an image. Adjust the position and scale in 2D, and check the print placement on the 3D model.
After adding artwork, you can use the existing tools: background removal, masking, filters, halftones, vectorization and pattern repetition. This is an editing stage in Designer, available independently of generation itself.
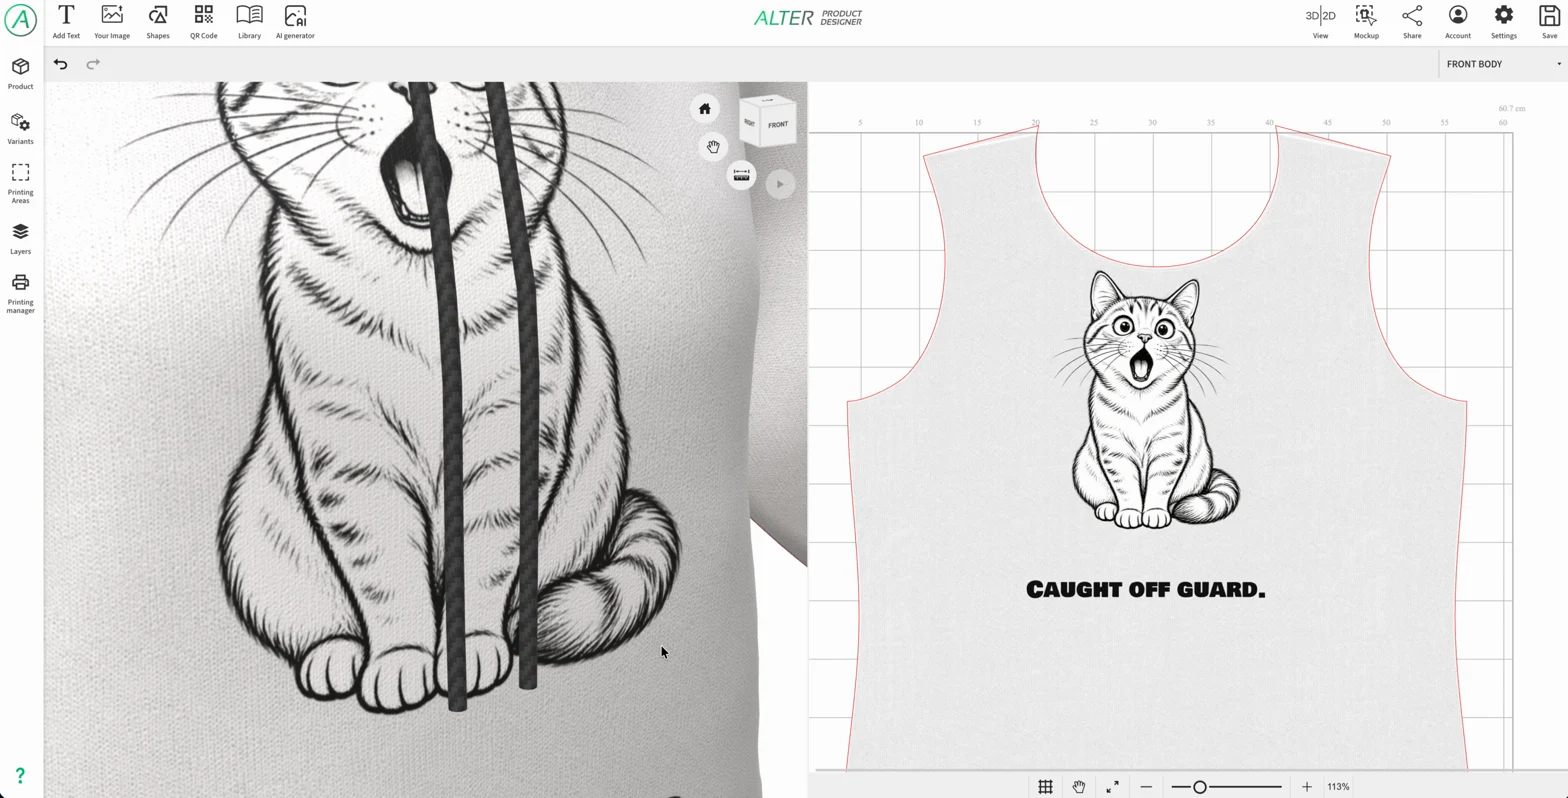
Save a project or template for future products
Once you have refined the design, save the project using Designer’s standard button. To reuse the composition, choose Save as new template (library) in the relevant save dialog. Use generation history to select results and the library to store reusable assets.
In WordPress, use the saved project or template in your store’s local products. Customers can personalize the shared composition in Customizer using the elements you prepared earlier. Generating an image does not automatically publish it to the library or your store’s product range.
Use your own AI in the WordPress + WooCommerce plugin
Configure AI for your store in WordPress. Connections and history from the Alter Product app do not automatically transfer to your local installation.
Add a provider and choose a connection method
Go to Alter Product → Settings → AI integration and select Add provider. Choose OpenAI, Google Gemini or Anthropic Claude. In Connection details, select the models you want to use.
A direct connection stores a separate key in the plugin, encrypted using the WordPress installation’s keys. Alternatively, you can use WordPress AI Client and a shared connector configured under Settings → Connectors. This option requires WordPress 7.0 or later and an available provider connector.
Save the connection, set limits, select Enable AI using my provider accounts and click Save AI settings. In the dialog that opens, read the information about costs, content processing and checking results, mark your acceptance and confirm the save. Adding a connection alone does not enable generation.
- Open Alter Product → Settings → AI integration.
- Add a provider and choose a direct connection or WordPress AI Client.
- For a direct connection, enter the key; for a shared connector, configure it in WordPress settings.
- Choose the use case and models, then save the connection.
- Set limits, enable AI, save the settings and acknowledge the required information about using your own account.
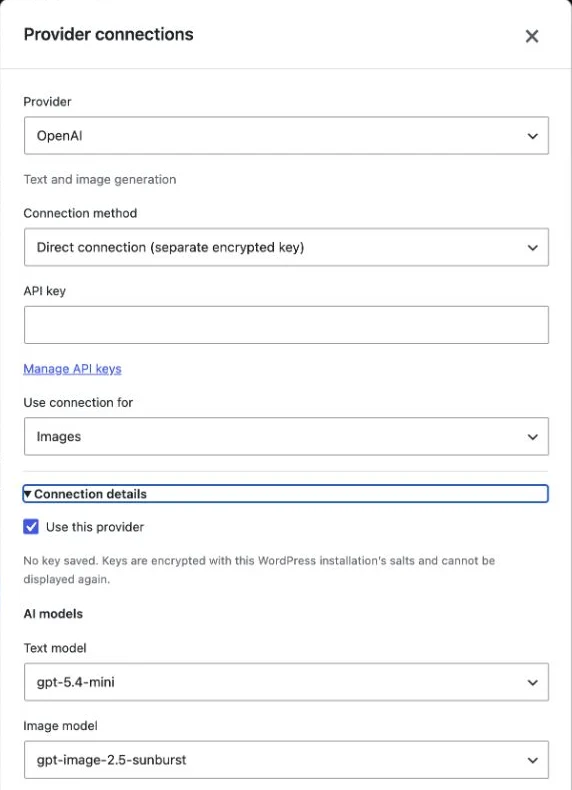
Adapt the configuration to the provider
For OpenAI and Gemini, an image connection also includes a text model used to prepare the composition. Choose both models in the details. Claude supports text work; to use it in the local generator, disable Image and select the text, simple vector or QR layers you need.
In the plugin, OpenAI image quality is capped at Low by default and can be changed in usage limits. The Gemini integration uses 1K resolution; this OpenAI quality cap does not apply to it. Settings and composition preparation differ from the service in the app, so the same prompt does not mean identical results in both places.
Generate as an administrator and share finished designs
Open a local product project through Product Designer in the plugin or the Designer action on a WooCommerce product. Start the AI generator there, prepare a result and add it to the project using the process described earlier.
Generation requires an administrator with permission to manage WordPress settings. The public Customizer, Configurator and Viewer do not run AI generation using the store’s key. They can display and use previously saved artwork in prepared products.
When you save a project or template, the required graphics are copied to local WordPress assets. Deleting an AI history entry does not remove independent files already saved in the project. Continue managing templates in Assets; this is not a separate AI generator in the assets tab.
Control usage and keep finished results
AI provider billing is separate from your Alter Product plan. You control when generation starts, and you can reuse saved graphics in projects later.
Distinguish an operation limit from a budget
Generation, regeneration and AI detail enhancement use the provider’s API. One action in the interface may involve more than one request, such as preparing the composition and generating the image. Previewing, inserting a saved result and standard upscaling do not start a new generation with the provider.
The plugin’s daily limit defaults to 20 request attempts and is shared by the site’s administrators. For a typical set with an image, planning and image generation usually use two attempts; text alone uses one. Failed attempts may also count. The counter resets at midnight UTC.
The attempt limit is not a monetary budget. Also set any spending limits available in your provider account and check its billing. Canceling a task does not reverse the charge for a call that has already been made. The app is subject to service and provider limits; these are not the same counter as your plugin’s limit.
Save useful results and protect your connections
Keep finished materials in projects or templates instead of relying only on AI history. Before sending them to production, check the lettering, sharpness, transparency, size and QR code readability. Then move on to print areas and Printing manager.
In the plugin, the direct connection and shared WordPress connector have separate key settings. Changing the connection method does not automatically transfer the secret between them. Direct keys and private AI history are tied to the installation’s encryption keys, so keep them together with a secure backup of your WordPress database and files.