Learn more

Product Generator - creating 3D models

Create 3D models of your products in Product Generator

Prepare your own product model: start with a template, adjust sewing patterns and sizes in Easy Creator, then drape the material in the simulation. Refine geometry, material layers and texture graphs to use the model in Product Designer and Alter Product's e-commerce tools.

This guide covers work modes, construction, physics and export. You can also prepare products for all-over printing (AOP), download sewing patterns and open the GLB model in 3D software such as Blender.

The screenshots show real Alter Product tools, some with an English interface. You can open each screenshot at full size.

Model ready? Create product mockupsExplore camera views, lighting and backgrounds, and generate design images in Designer and WooCommerce.

Work modes: choose the tools for your stage

The mode menu in the upper-left corner of Product Generator provides 12 work areas. Changing the mode changes the tools and panels for that stage, from pattern construction and the mannequin to simulation, materials and mockups.

Work mode and 2D/3D views

The mode determines what you edit. The view switch determines how you see the project: in 2D, in 3D or on a split screen. For example, you can prepare seams in 2D and check their connections in 3D within the same Sewing mode.

During product construction, the 2D view shows sewing patterns. In 3D Model Inspector, you work with the finished model mesh and its UV layout. The tools and available panels adapt to the selected mode.

What you can do in each mode

The names below correspond to the application's menu entries. Choose a mode according to the task you want to perform.

Mannequin pose and movement

Prepare the body on which you will drape the product, or check clothing in motion.

  • Choose a male or female mannequin, set an A-pose, T-pose or relaxed pose, and refine bone positions with the manipulators.
  • Use symmetrical pose editing and walking or running animations with adjustable speed.
  • For other products, choose a cuboid or cylinder and adjust the support's dimensions, position and rotation.

Mannequin body shape

Adjust height and body proportions to the size range you are preparing.

  • Start with a slim, neutral, athletic, curvy, stocky or heavy body shape.
  • Adjust body regions including the neck, chest, abdomen, hips, arms, thighs and lower legs. The colored Control rig cross-sections let you change a selected area directly in 3D.
  • A body-shape preset changes proportions; height and bone pose remain separate settings.

Reference

Use a photo or drawing as a reference for reconstructing a sewing pattern.

  • Add an image from disk or drag it into the editor. Set its position, rotation, opacity and display above or below the pattern.
  • Calibrate the image by marking two points and entering the actual segment length. Calibration using four corners plus width and height also lets you straighten a photograph.
  • Group images and assign them to the appropriate patterns. Reference editing is available in this mode.

Shape

Build and refine pattern geometry in the base size.

  • Move points, edges and Bézier handles. Add your own points and choose independent or symmetrical handle control.
  • Create new rectangular pieces, use pocket shapes, cut internal holes and add sharp fold lines with angle and stiffness settings.
  • Position individual panels in 3D: move, rotate and curve them before sewing.

Symmetry and folds

Prepare mirrored patterns and controlled fabric folds.

  • Position and rotate the symmetry axis and check the mirrored preview.
  • Set the Fold line separately and choose the side toward which the fabric should fold.
  • Adjust the width and depth of the fold zone. Symmetry, folding and sharp fold lines have separate settings.

Seam allowance

Add the extra fabric needed to make a seam.

  • Set an allowance for the selected edge by dragging its outline or entering a numeric offset. Symmetry axes and technical fold lines do not receive allowances.
  • Control the allowance independently of the pattern shape and the lines joining the pieces to be sewn.
  • Include allowances later when downloading SVG or PDF sewing patterns.

Sizes

Add sizes to the model and check pattern grading.

  • Choose the base and active sizes, add further sizes, rename them and remove those you do not need.
  • Select a measurement on the pattern and edit its value for the active size. Compare the whole size range in the table and with overlays.
  • Refine base-size geometry in Shape mode; Easy Creator can prepare values from the template beforehand.

Sewing

Define which pieces should connect during simulation.

  • Select edges in 2D or 3D, draw internal sewing curves and transfer the edge path of another pattern onto a panel.
  • Set matching or reversed pairing direction. Choose a straight seam or accordion pleats with control over pleat count, spacing and direction.
  • Add point tacks between pieces of fabric and fasteners: zippers, hook-and-loop fasteners, buttons, snaps, hooks and eyelets.
  • For fasteners, adjust the connected sides, overlap, layer order and opening range.

Ropes

Prepare lacing, drawstrings, straps or chains connected to the product.

  • Draw a path in 2D, edit its points and Bézier handles, attach it to patterns and refine its placement in 3D.
  • Choose a round or flat profile, or a chain. Set the diameter or width and thickness, profile rotation or link dimensions.
  • Adjust length and slack. Configure the connection's behavior, contact with fabric and mesh density in Simulation mode.

Simulation

Sew the prepared pieces together and shape the product through forces and contact with the mannequin.

  • Set physics for individual patterns, ropes and the whole scene. Start, pause, resume and reset the simulation.
  • Grab and drag fabric, add pins and bindings, and control fastener behavior.
  • Check the product in a static pose and during animation. Save the finished drape through Generate 3D model as a static or animated model.

3D Model Inspector

Move from the simulated shape to a finished model and its surface.

  • Select saved models, quality variants and scene parts. Inspect the 3D shape and UV layout together.
  • Refine geometry with modifiers, build materials with layers, masks and pattern graphs, and bake ambient occlusion (AO).
  • Add 3D elements, work on textures and play saved animations. Later sections of this guide describe these tools in detail.

Mockup

Use the finished model to prepare repeatable visuals for subsequent designs. This stage has a separate guide: Generate product mockups in seconds.

  • 3D composition: product framing, camera, lighting and background.
  • Photo fitting: positioning the model against your own photograph.
  • Mapping: refining print outlines and the layers of the resulting visual.

Go from construction to a finished model

You can return to earlier stages when you need to change the cut or drape. This sequence makes it easier to prepare your first product:

  1. Choose a template and sizes in Easy Creator. Set the mannequin's body shape and pose.
  2. Refine Shape, Symmetry and folds, Seam allowance and Sizes. Reference helps you recreate your own cut.
  3. In Sewing, connect the parts and add fasteners. In Ropes, prepare additional connections.
  4. Start Simulation, check the material and save the drape through Generate 3D model.
  5. Refine geometry and materials in 3D Model Inspector. Save the project, use the model in Designer or export GLB and sewing patterns.

Start with a template and Easy Creator

The model is built from organized elements: sewing patterns, their sizes, connections and scene settings. A template provides a starting point you can continue to edit.

Product category and starting cut

In Product Generator, choose a product category, then an available starting cut. Search and the division into soft and rigid models help you find a template. In the WordPress plugin, you can start with a downloaded template in Assets or open a local generator project.

Sizes and measurements step by step

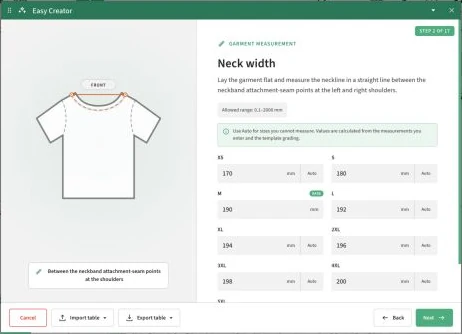
The built-in Easy Creator helps prepare sizes without manually changing every pattern point. For templates with the measurement wizard, set the base size and the names and order of other sizes, then work through illustrated product measurements.

Enter the values you know. For the rest, you can use Auto, which calculates them from the supplied measurements and template grading. The measurement table can be exported and imported in Excel, CSV or JSON format. Finally, review the summary and choose Build patterns.

Easy Creator showing a neck-width measurement illustration, the base size and Auto buttons for other sizes.
The measurement wizard shows where to measure and compares values across sizes. Table import and export are available at the bottom.

Precise pattern and connection editing

Work in 2D, 3D or split view. Work modes separate shape, symmetry, allowance, size, sewing and rope editing. This lets you focus on a specific construction stage.

  • Shape: move points, edges and Bézier handles. Add new pieces, holes and sharp fold lines.
  • Reference: add your own image, set its opacity and calibrate scale against a known segment. Control dimensions in mm, cm or inches.
  • Symmetry and sizes: work with mirrored pieces, folds and size overlays. Compare values in the grading table.
  • Sewing: connect edges, draw sewing lines and set pairing direction. You can also select connections in 3D. The allowance remains independent of the sewing line.
  • Construction details: use point tacks, zippers, hook-and-loop fasteners, buttons and snaps, or hooks and eyelets. Ropes can have round or flat profiles, or form a chain, with attachments on the patterns.
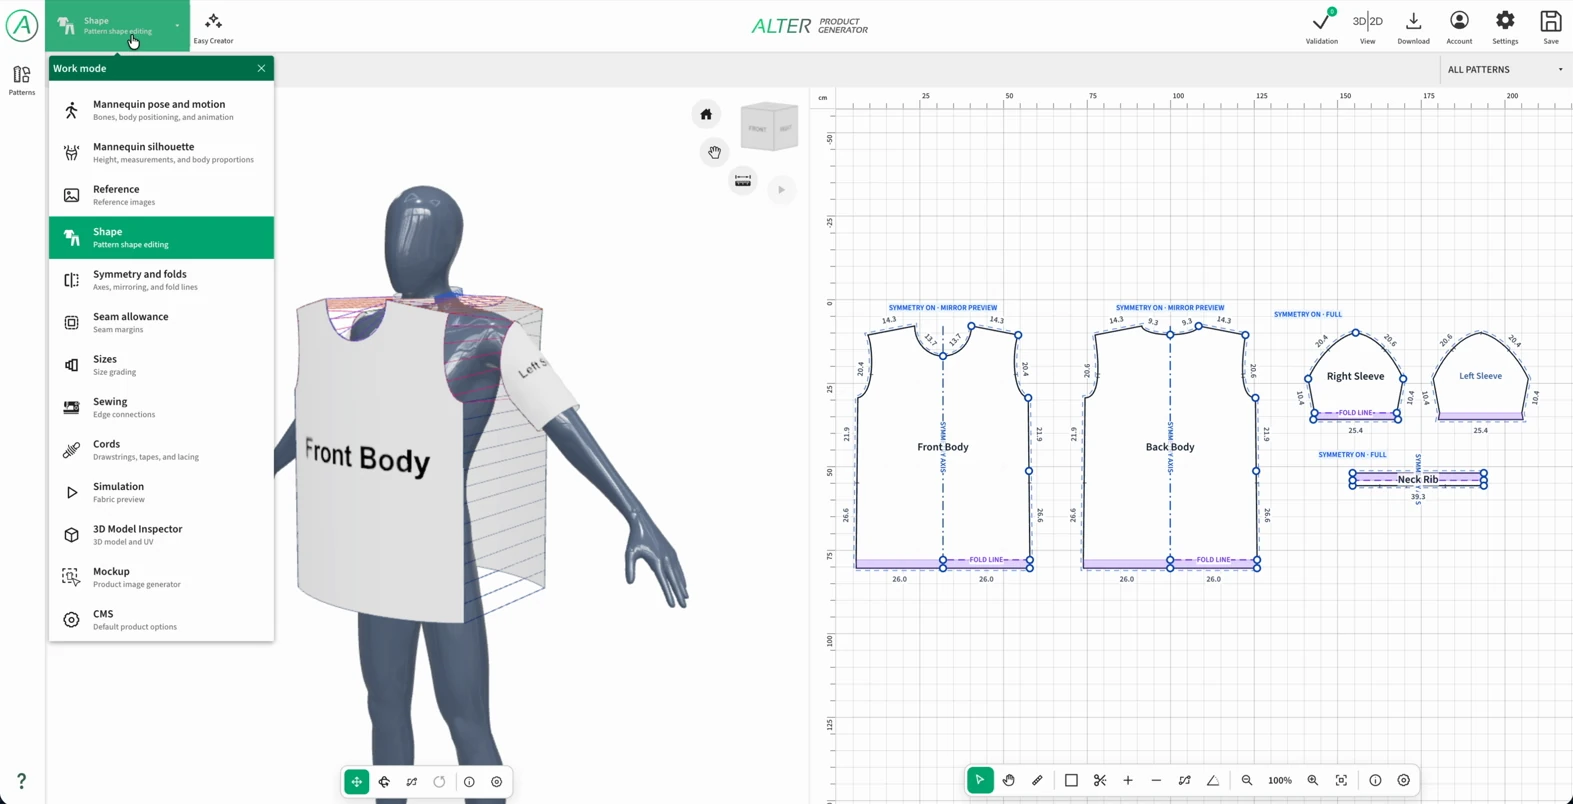
Pattern editor: a mannequin with T-shirt panels, 2D patterns and the work-mode menu open.
The 2D and 3D views help relate individual patterns to their position on the product.

Create products for all-over printing (AOP)

Product Generator also lets you prepare your own products for AOP. Artwork can cover entire printable product parts, such as a T-shirt's front, back and sleeves. Sewing patterns and prepared sizes form the starting point for the 3D model and print areas corresponding to its parts.

This combines construction and graphic design: in the generator, you develop the cut and fabric drape; in Product Designer, you compose artwork on its surfaces. The 3D preview helps assess motif placement across the whole product, including near seams.

  1. Prepare patterns and sizes using the template and Easy Creator. Refine the shape, allowances and connections between parts.
  2. Sew and drape the fabric in the simulation, then generate the 3D model. The model brings print areas derived from the patterns and their sizes into Designer.
  3. In Designer, add graphics, text or repeating patterns to selected surfaces. Check print boundaries, dimensions and layout for individual sizes. You can also share the prepared design with customers for personalization in Customizer.
  4. Use the mockup generator to present the design from different sides. For production, download separate PNG, SVG or PDF print-area files from Printing Manager. Download sewing patterns separately from Product Generator.

Check fabric drape with physics simulation

Connect pattern edges and start the simulation. The engine gradually closes seams, while fabric settles under gravity, contact with the mannequin and each part's properties. You can grab fabric in 3D, refine folds and check how the product behaves in motion before generating the model.

Prepare the mannequin, body shape and movement

In Mannequin pose and movement and Mannequin body shape modes, choose a body suited to the product. Set height, proportions, an A-pose or T-pose, or your own bone positions. For products other than clothing, you can use a rounded-edge cuboid or a cylinder with adjustable dimensions.

Choose an animation, such as walking, runway walking or running, and adjust its speed. Motion played in place lets you observe the clothing's response. Physics settings can allow draping time before movement and a gradual animation start.

  • Enable the mannequin collision regions you need and choose the quality of its collision surface.
  • Stop the simulation before changing body shape, bones or support geometry. These changes establish a new starting state.

A separate physical material for each part

The body, ribbing, hood and lining can behave differently. Select a pattern in the material physics panel and adjust its parameters. Physical material determines fabric behavior; you develop color, texture and sheen separately in Inspector layers.

Each part has independent static and animated profiles. Selecting a profile to edit does not start an animation. Applying a preset changes only the profile being edited; the other retains its own settings.

  • Create and name your own material based on the active preset.
  • Copy entire settings sections between patterns and profiles to obtain consistent behavior across several parts.
Presets as a starting point for your own fabric
MaterialEffect and example use
Soft and stretchyFluid drape and easy folding, for example for soft knit fabric.
Thick and stableMore pronounced, broader folds and greater stability, for example for a sweatshirt body.
Directionally stretchyDifferent warp and weft compliance, useful for ribbing among other applications.
Dense with little stretchShape retention and resistance to diagonal deformation, for example for a bag.
Very stiffStrong resistance to bending and deformation, for example for a visor or reinforced piece.

Control stretch, folds and shape retention

Warp and weft directions follow each pattern's grainline. Its direction matters for materials that stretch differently lengthwise and crosswise.

Key physical material parameters
SettingWhat it changes in the product
Mesh point spacingSmaller spacing produces more points and finer folds, but requires more memory and computation. Changing it requires restarting the simulation.
Warp and weft stretchControls resistance in the fabric's two directions. A shared stiffness slider changes their strength while preserving the ratio.
Shear resistanceLimits diagonal deformation where a mesh section changes into a diamond shape.
Bending and bucklingBending stiffness affects folds. The buckling threshold and post-buckling stiffness let you refine the formation of sharper creases.
ShrinkageShortens the material's rest lengths in the simulation. This gives a tighter fit without changing the 2D pattern or UV layout.
Shape retention (Solidify)Helps preserve a part's initial 3D shape, such as a stand collar or visor. This is a physics parameter; set the finished mesh's thickness separately with the Solidify modifier in Inspector.
Stabilization after drapingCaptures the form after a specified time and maintains it at the selected strength. It limits further deformation while retaining collisions and motion transferred from the mannequin.
Gravity, mass and dampingAdjust falling, a part's contribution to the movement of sewn panels and oscillation damping. Zero gravity does not disable wind or collisions.
PressureActs perpendicular to the surface, in either direction depending on its sign. With two appropriately sewn layers, it can create a rounded cushion or down-filled chamber.
Deformation limitsMaximum movement per step and mesh extension help limit sudden corrections and excessive stretching.
Spacing and frictionSeparately define the distance from the mannequin and between fabric layers. Friction determines how easily fabric slides over the surface.
Contact during movementCollision response, adhesion, contact damping and mannequin motion transfer let you refine how clothing follows an animation.

Set sewing, forces and quality for the whole scene

The scene physics panel complements the materials of individual patterns. Use it to control how parts join, external forces and computational cost.

Scene settings and their uses
AreaAvailable control
SewingThe force pulling parts together, target seam distance, sewing time, gravity delay and gradual gravity ramp-up. These help connect panels first and then let them drop.
Mannequin physicsSurface collision, surface margin and auxiliary collision capsules.
Gravity fieldThe force direction, including a custom direction set with angles or a manipulator. Set its strength for a material in that pattern's profile.
WindIntensity, direction, gust cycle and turbulence. Assess fluttering and the response of loose parts of the product.
QualityFull, Balanced or Fast, separately for cloth and ropes. Changes take effect during simulation.
Simulation computationSteps per second, catch-up limit and stretch corrections let you balance stability and device workload.
Animation startDraping time before movement and a gradual start.

Grab fabric and hold it at selected points

After starting Simulate, you can drag fabric directly in the 3D view: pull a T-shirt away from the torso, refine a fold or help parts settle around the body. Attachment tools let you hold the result while continuing to work.

Fabric grabbing

Drag a selected area of actively simulated material.

  • Refine local drape and observe the response of the other sewn parts.
  • After release, the fabric continues responding to forces, collisions and its assigned material profile.

World or mannequin pins

Add pins during an active simulation and choose how they hold the fabric.

  • Hard world pins hold a fixed location in the scene; Soft pins allow gentle deflection, while Elastic pins provide a spring-like attachment.
  • Hard mannequin pins follow the mannequin's movement.
  • Move and delete pins, and adjust their strength and influence radius.

Point and circumferential bindings

Connect fabric to a point, circumference or arc segment on the mannequin, for example at the waist, hips or a shoulder strap.

  • Choose an edge or a cross-section inside the pattern. One binding can include several parts.
  • Adjust slack, strength, softness, influence radius and offset from the body.
  • Prepare the position and number of points before starting; you can adjust strength and fitting parameters during the simulation.

Fabric-to-fabric tacks

Connect two points of fabric to hold product pieces together locally.

  • Add them in Sewing mode by dragging between pattern points.
  • Tacks are saved in the project and remain editable after the simulation stops.
  • Adjust strength and radius to control the local connection.
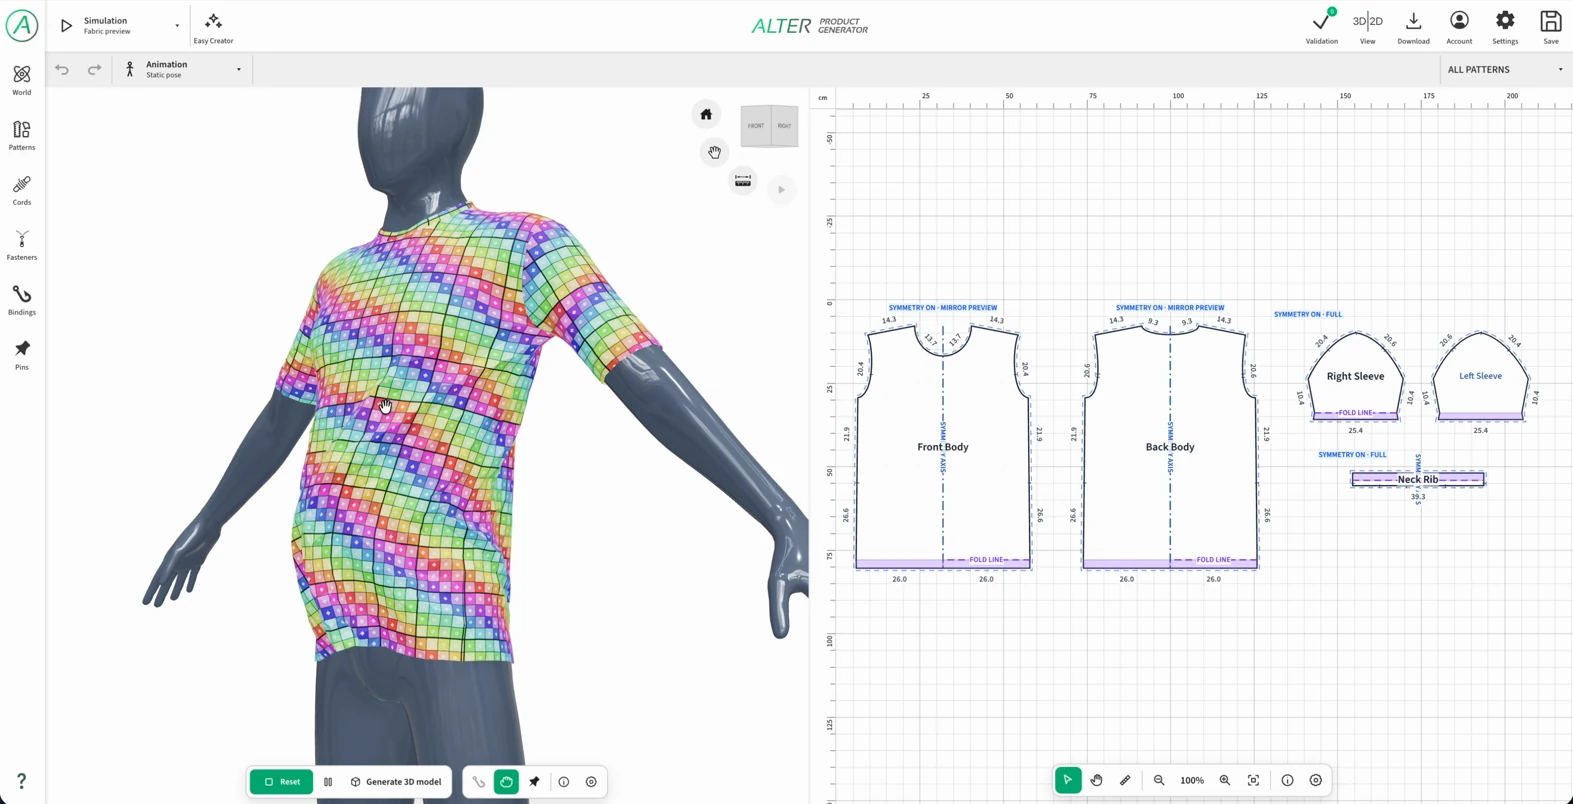
Interactive T-shirt simulation on a mannequin in Product Generator.
A frame from the prepared T-shirt simulation. Refine the fabric drape by grabbing and dragging.

Refine the drape without starting everything again

Pause and resume the simulation, or use reset to return to the initial arrangement. Most material settings synchronize live without resetting positions, seams or pins.

  • Resetting a single pattern lets you adjust one part while preserving the other parts' drape and its bindings.
  • New shape captures the part's current form for stabilization. This reference remains until that part is reset or the simulation restarts.
  • Enable previews of the triangle mesh, colored UV checkerboard, sewing lines, bones and collision regions to assess the result more clearly.
  • Changing point spacing rebuilds the mesh and requires a restart. Switching computational quality alone does not rebuild geometry.

Simulate ropes, straps and chains too

Elements prepared in Ropes mode have their own physics panel. Choose a soft, stable or stiff preset, then create your own. A physics preset does not change the path, dimensions, length, slack or attachments.

  • Set gravity, damping, stretch and bending compliance, and the number of solver iterations.
  • Choose contact with the mannequin and specific pattern parts. Adjust friction, offset, contact damping and impact damping.
  • Adjust physics parameters live or reset a single rope. Changing its mesh resolution requires stopping the simulation.

A practical workflow: from T-shirt panels to a finished drape

For your first product, refine construction, contact and movement in sequence. This makes it easier to identify which setting affects the result.

  1. Set the body shape and pose, position parts around the mannequin and check connection directions in Sewing mode.
  2. Assign materials separately to the body, sleeves and ribbing. Choose point spacing before starting.
  3. Start Simulate and watch the seams close. Refine sewing time and gravity onset if parts fall before they can connect.
  4. Grab the fabric to refine folds and pull it away where needed. Use pins or a binding to hold a selected location.
  5. Check spacing and friction, then the chosen animation. Assess behavior both at rest and in motion.
  6. When the drape is ready, use Generate 3D model and move to Inspector.

Preserve the drape as a static or animated model

When the drape is ready in an active simulation, choose Generate 3D model. Without a selected animation, you save a static model. For animations, the Bake dialog lets you set FPS, stabilization cycles and recording cycles.

Bake saves successive mesh shapes as animation frames. You can later play the saved motion in Inspector without recalculating physics. Exporting an animated model transfers the recorded result; simulation settings and calculations remain in the generator project.

Refine geometry in 3D Model Inspector

Inspector combines the 3D model view, UV layout and scene tree. Select a model part to work on its geometry and surface.

Model, UV layout and saved animations

Assess the shape from different sides and inspect its corresponding UV areas. The model panel separates static versions, animated versions and quality variants. Play an animation on the timeline and refine loop continuity.

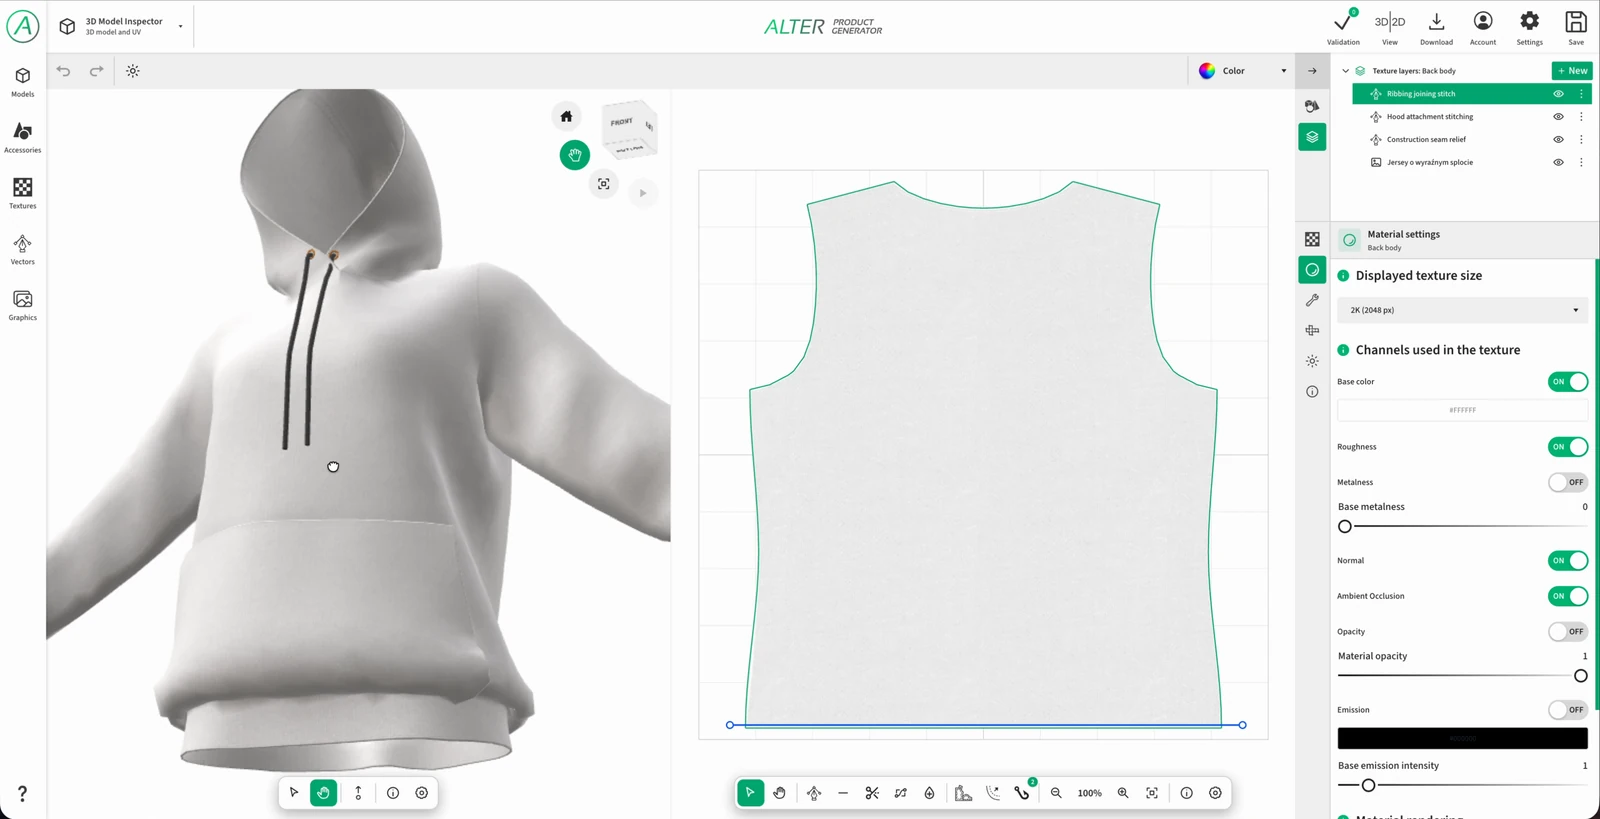
3D Model Inspector: a white hoodie, the rear panel's UV layout, texture layers and material settings.
A generated hoodie model in Inspector. This is the stage for refining surfaces and geometry before using it in designs and mockups.

Geometry modifiers

Modifiers act on the selected mesh part. You decide separately whether an effect is visible in the preview and whether it is included in the export.

Available model modifiers
ModifierUse
Predicted SizePrepares a target size from patterns and grading while preserving the base model's drape. Requires a Bake with the appropriate data; also provides seam alignment and relaxation.
Subdivision SurfaceIncreases mesh density and smooths the surface. Preview levels 0-2 let you balance detail against computational cost.
Corrective SmoothSmooths irregularities. Set strength, iteration count and the Simple or Length Weight smoothing method.
SolidifyGives the material thickness, rounds edges and lets you choose whether thickness extends inward or outward. It can omit rims along sewn edges.

Baking ambient occlusion (AO)

The separate AO Bake tool calculates contact shadows from scene geometry. Choose objects, resolution, sample count and range. The result goes into a Baked shadows layer. This helps emphasize contact and recesses between product parts.

Layer types and material construction

Select a model part in Scene and open Layers. A material can combine several layer types, from base color and images to text, painting, procedural fabric and vector stitching. Each remains a separate element for further editing.

Six layer types: what you can build with them

Use New in the selected part's texture layers panel. The layer type determines the image source and its editing tools.

Image

Uses an image from a file or library as a texture source. It can be artwork, a print pattern or a ready-made material map.

  • Add or Change image in a channel slot; drag an asset into the appropriate slot.
  • Image position, scale, rotation, repetition, spacing and cropping on the UV layout.
  • Opacity and blending per channel; texture slots also provide a modifier stack and image download.
  • Example: a logo on the front of a hoodie or a surface photograph assigned to the material's color.

Fill

Applies a uniform color or gradient and constant values for selected material channels.

  • Solid color, linear gradient or radial gradient.
  • Gradient color stops, positions and angle; center and radius for radial gradients.
  • Separate channel values, such as roughness, metallic and emission, with their opacity and blending.
  • Example: a T-shirt's base color, a color transition or an area with different sheen limited by a mask.

Text

Creates editable lettering on the model's surface.

  • Content, font selection and search, style and character-set filters.
  • Size, alignment, letter spacing, line height, letter case, bold, italic, underline and strikethrough.
  • Normal, Curved, Bridge or Perspective shape.
  • Text color or gradient; values for other active channels; transformation on the UV layout.
  • Example: a curved collection name or a number on the back, with text roughness set independently of the fabric.

Brush

Stores painted strokes and stamps as a separate material layer. Add color and local relief or surface effects.

  • Brush and eraser in the UV view; soft/hard round, airbrush, marker, dry brush, calligraphic and flat square presets.
  • Crease, Fold and Wrinkles presets for local creases and folds in surface maps.
  • Size, hardness, Flow, Spacing, stroke smoothing, stamp shape/aspect ratio and rotation, and alignment with stroke direction.
  • For supported presets: Focal Shift, Z intensity, end tapering, fold spacing and fold count.
  • Example: a subtle worn color patch, a local shadow or a short wrinkle on a sleeve.
  • Relief is created in surface maps; refine the actual fabric drape in the simulation.

Procedural pattern

Calculates a repeating material structure from parameters or a graph without manually painting every fiber.

  • Choose a ready-made preset or your own pattern; scale, color, contrast and irregularity settings depend on the recipe.
  • Roughness, metallic, normal map strength and AO.
  • The recipe's quick parameters and Edit node graph let you develop your own structure; you can save a custom pattern.
  • Transformation and repetition on the UV layout.
  • Example: jersey on a T-shirt body and 1×1 ribbing on the collar; denim with contrasting warp and weft.

Vector

Creates editable paths and closed shapes. A path can have a regular stroke, fill or procedural stitching and surface relief.

  • Pen, points and Bézier handles, path cutting and filling closed regions.
  • Stroke, fill and procedural stitches with separate control over color, thickness, sheen and relief.
  • Linking to pattern points or a pattern line helps guide details along an edge.
  • Example: stitching around a collar or overlock along a hem.

Color, sheen, relief and transparency

A layer can affect selected material channels. Availability depends on the layer type and material settings. First enable the required channel in the material, then adjust it on the layer. Disabling a channel preserves its data.

Material channels and their effect on the product
ChannelWhat you get
Base ColorThe color of fabric, prints, text or details. Changing color does not have to change sheen or relief.
RoughnessSurface roughness: from sharp gloss to diffuse matte reflections. Useful for distinguishing fabric, paint and smooth details.
Metalness / MetallicThe surface's metallic character. You can distinguish a metal accent's appearance from the product's main material.
NormalApparent relief: weave, fine fibers, stitching or a wrinkle visible through surface lighting.
AOLocal darkening of recesses and contact areas that makes the texture easier to read.
OpacitySurface visibility and transparency, such as openings in an appropriately prepared fabric mesh.
EmissiveThe surface's emission color. Available in layers and graphs that support it.

Order, blending and repetition

Name layers, reorder them, hide them and copy them. Groups help organize and hide elements together, such as prints, seams and wear marks. You can add a shared mask to a group.

In a channel slot's settings, adjust opacity and blending mode: Normal, Multiply, Screen, Overlay or Soft Light. For example, Multiply in the color channel can overlay dark wear marks on fabric.

Image, Text, Brush, Procedural pattern and Vector have position, X/Y scale, rotation, repetition and spacing. Image also lets you crop the source. Fill has its own gradient settings.

Layer and group masks

Add a mask from a layer or group menu. Any of the six types can be its source: Image, Fill, Text, Brush, Procedural pattern or Vector. Choose Masked channels to limit only color or only sheen, for example.

  • White reveals, black hides and gray partially lets content through. Invert mask reverses its effect.
  • A brush mask can remove part of a dirt effect; a vector mask can restrict sheen to a precise shape; a group mask covers several layers at once.
  • Transparent pixels outside the painted mask leave content visible. Multiple masks combine by intersection.

Vector stitches, edging and gathers

The vector defines the detail's path, while the preset describes how it is drawn. This lets you separately control collar stitching, a sleeve hem, overlock and relief at fabric joins.

  • Straight stitch: even thread segments; set length, spacing, thickness and color. The T-shirt template uses it in the Collar stitching layer.
  • Zigzag and overlock: choose the appropriate preset. Overlock has needle-line count and spacing plus zigzag height; the Bottom hem overlock layer is this type of vector.
  • Hand stitches: running stitch, backstitch, cross stitch and blanket stitch produce different rhythms and finishes along the same path.
  • Fabric join - recess / ridge: set profile width and sign, transition softness, asymmetry and contact groove. This creates visual relief where two parts meet.
  • Folds - waistband gathering: set fold length, thickness, spacing, depth and irregularity; this surface effect suits waistbands and ribbing.
  • Pattern linking: copy an edge or select points to track. Set offset, direction and tracking of positions or Bézier handles so the detail follows changes to the pattern.

Modifiers for your own images

Add a modifier in the image slot's settings. You can disable or remove it and download the processed image. This lets you prepare a source texture without changing the material's other layers.

  • Image filters: exposure, gamma, contrast, brightness, hue and saturation, colorization, black and white, and thresholding.
  • PBR map generator: creates Opacity, Roughness, Metalness, Normal and AO channels from an image, with separate output settings. Image-derived AO is a different process from baking shadows from geometry.
  • Seamless generator: reduces visible seams in a repeating texture. Options include offset, edge blending, multiband offset, scattered patches, Graph-cut + multiband and Image quilting.

Pattern graphs: nodes, connections and ready-made effects

A graph describes how a procedural texture is created. Nodes generate structure, transform coordinates, combine masks and assign colors, sending the result to material channels. Changing one parameter can refresh the entire pattern and its preview.

Open the graph and see how the material is built

In a Procedural pattern layer, choose a ready-made recipe or Create new, then Edit node graph. The node library is on the left, connections in the center, and a material or channel preview on the right. Preview the material on a sphere, cube or plane.

The library brings together three levels of work: basic nodes performing one operation, generators and modules building more complex structures, and complete material recipes. You can add a recipe to the graph or expand it and change its internals.

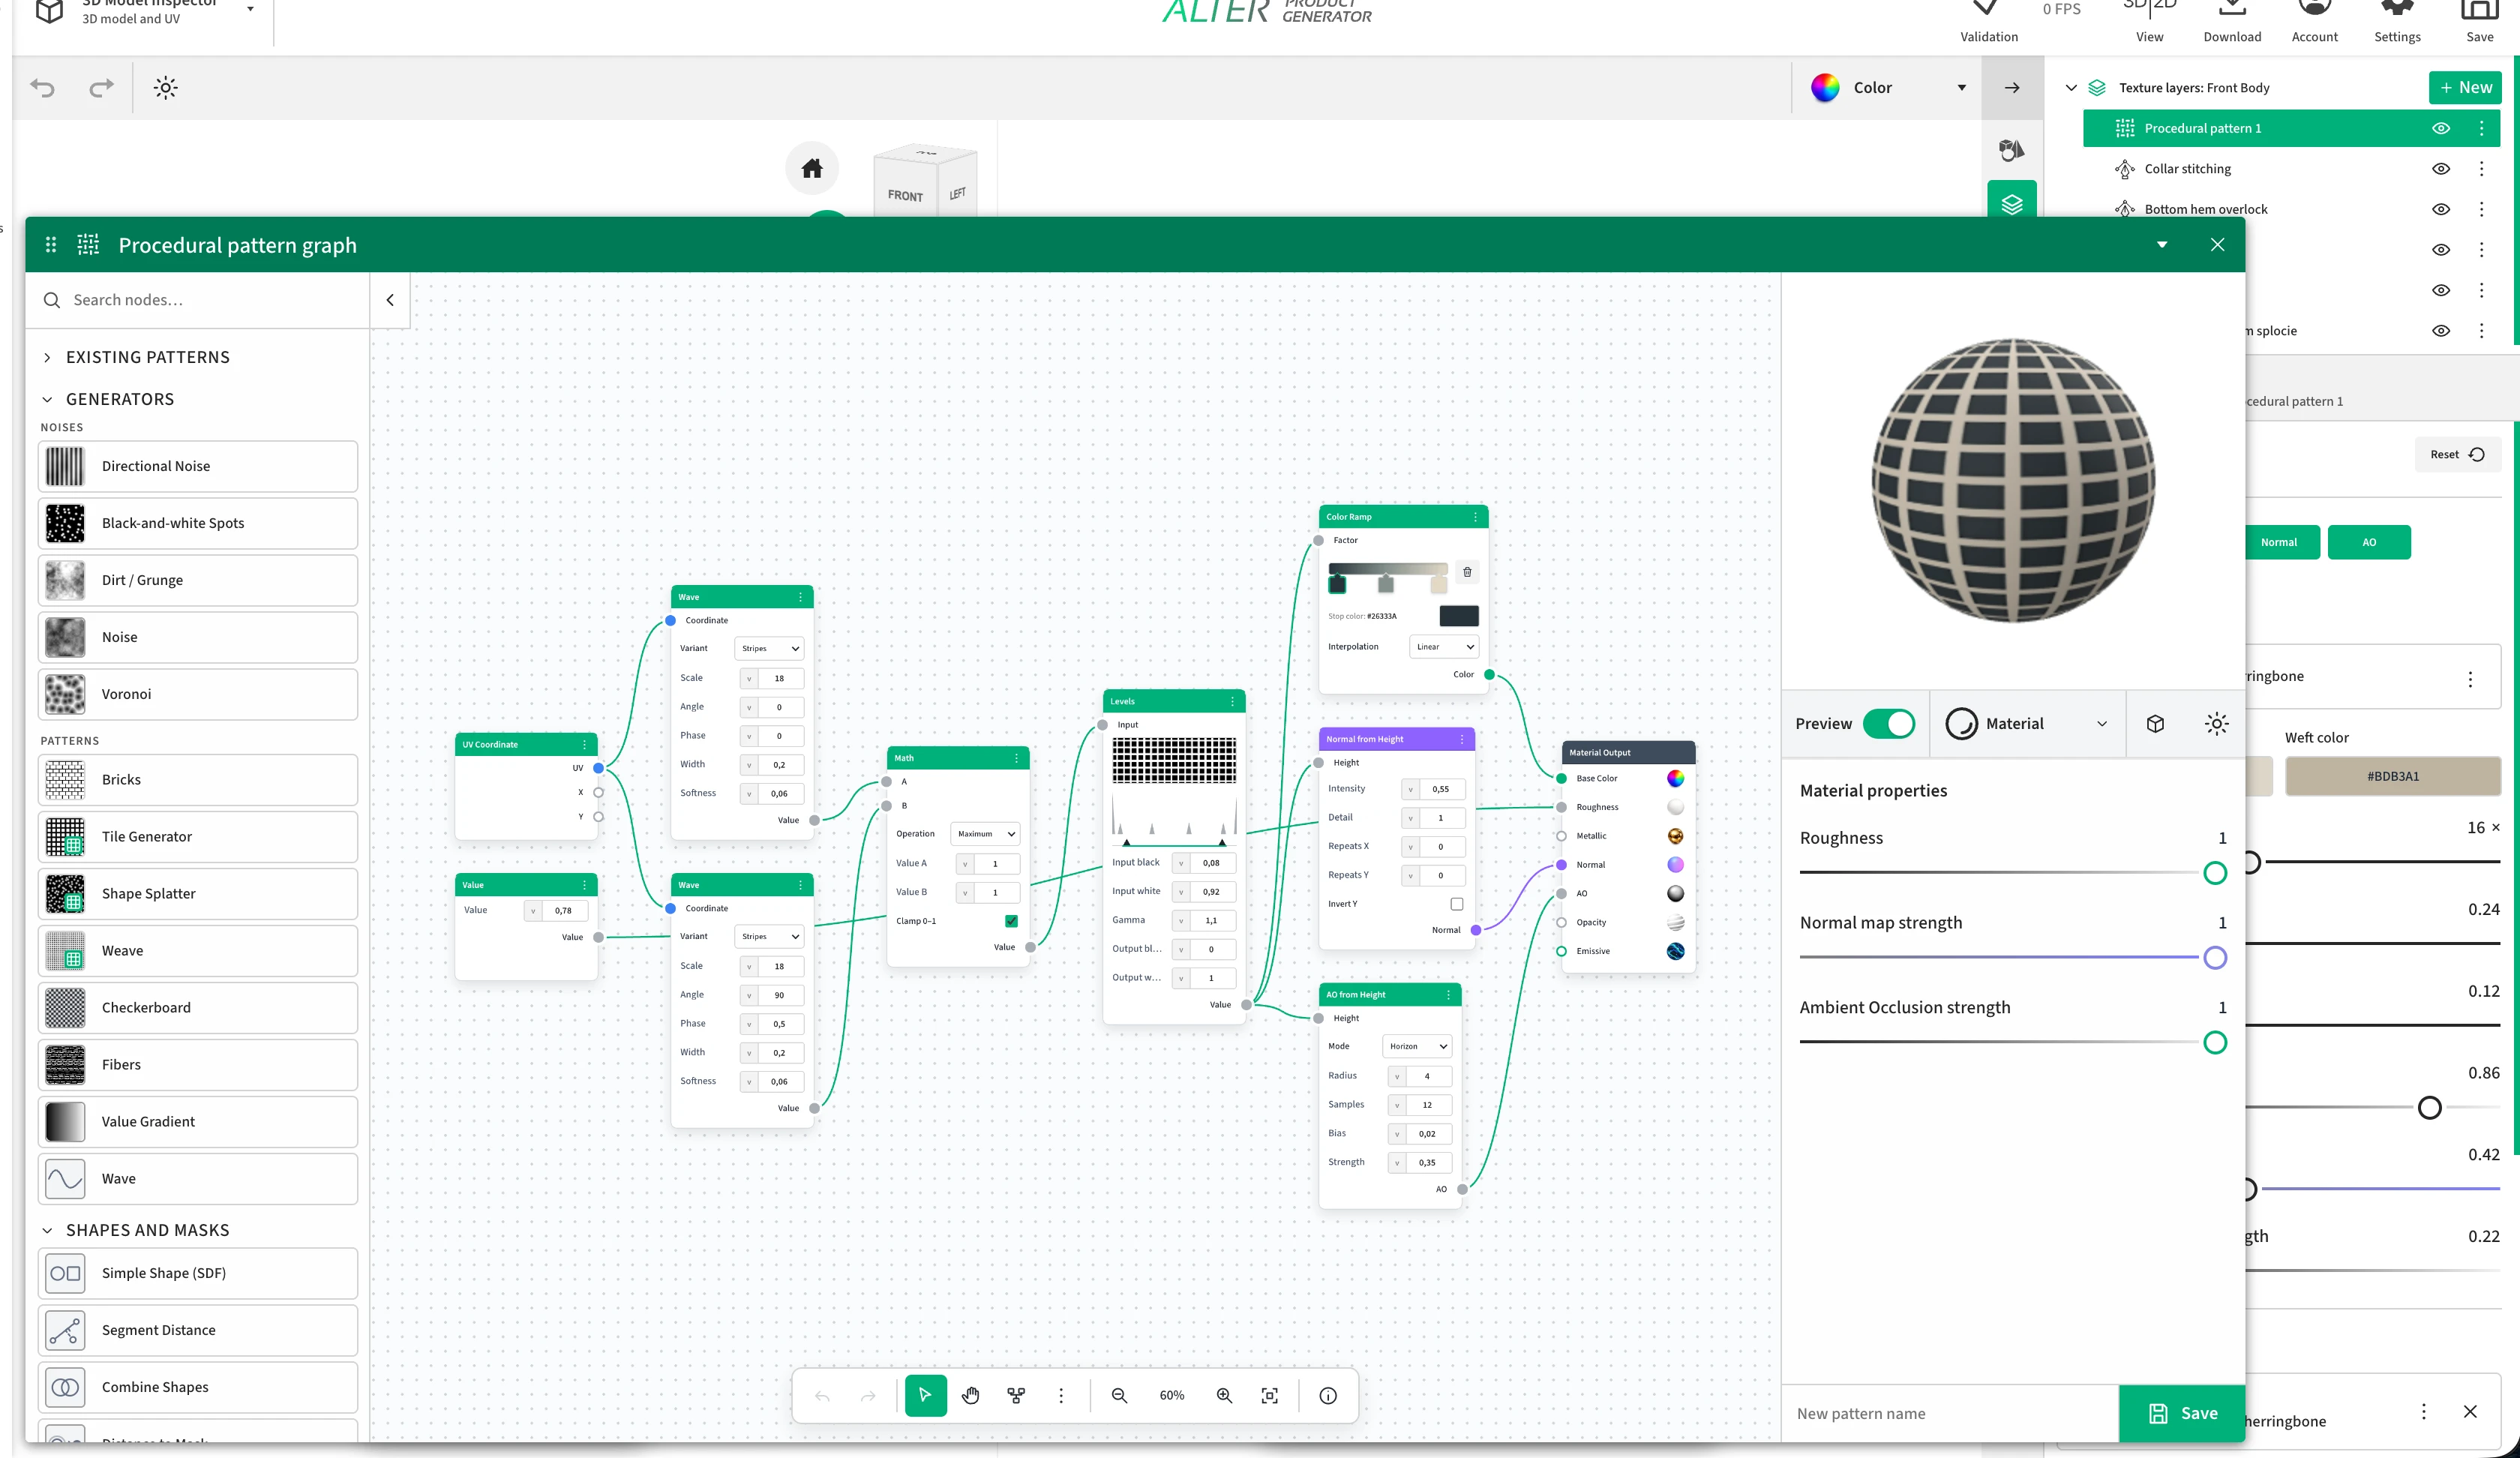
The procedural pattern graph editor in Alter Product: a generator library, two Wave nodes connected through Math and Levels to material channels, and a grid preview on a sphere.
The actual graph from the supplied screenshot: two waves build a grid that feeds color, Normal and AO. The result preview is on the right; a material layer stack with a pattern and stitches is visible behind it.

The screenshot example: a grid with color and relief

Two waves running in perpendicular directions form a regular grid. The same structure then controls both color and the material's surface.

  1. UV Coordinate supplies shared coordinates to two Wave nodes. Set one horizontally and the other vertically.
  2. Math in Maximum mode combines the wave results. Changing scale makes the grid denser, while Width and Softness change line width and softness.
  3. Levels refines the brightness range and contrast. Color Ramp assigns colors to the resulting structure and passes them to Base Color.
  4. Normal from Height uses the same structure as relief in the Normal channel, while AO from Height emphasizes recesses in AO.
  5. Value supplies constant roughness to Roughness. In the preview, assess color, reflections and surface detail together.

Node and generator catalog: settings and results

Choose a group and expand its description. English names help you find the same nodes in the interface. Each entry lists inputs, key settings, the resulting output and an example use.

Generators: Noises

Noises and their families provide irregular maps for color, masks, height and roughness. A seed lets you return to the same arrangement.

Noise

Inputs
Coordinates (2D vector).
Settings
Perlin, fBm, Ridged, White or Gaussian; scale and seed. fBm and Ridged also provide detail, roughness and lacunarity. An older graph variant may show X/Y period.
Result
An irregular value map, ranging from smooth variation to fine noise depending on the variant.
Use
Breaking up a uniform surface, varying roughness, or providing a basis for a mask or height map.

Voronoi

Inputs
Coordinates (2D vector).
Settings
Distance, Edge or Cells mode; Euclidean, Manhattan or Chebyshev distance; scale, randomness and seed.
Result
A map of distance to points, cell boundaries or cell values.
Use
Pores, grain, cellular patterns and irregular surface divisions.

Directional Noise

Inputs
UV coordinates; adding the family also creates a helper UV node.
Settings
Four Directional Noise variants, 1-4; scale, angle and seed.
Result
Directional noise as a value map.
Use
Streaks, stretched textures and directional variation in color, height or sheen.

Black-and-white Spots

Inputs
UV coordinates; adding the family also creates a helper UV node.
Settings
Three spot variants; scale, threshold and seed.
Result
A high-contrast map of irregular spots.
Use
Local color changes, dirt masking or selecting areas with different roughness.

Dirt / Grunge

Inputs
UV coordinates; adding the family also creates a helper UV node.
Settings
Dirt 1-3 and Grunge - concrete, streaks, stains and scratches. Scale and seed; depending on the variant, also detail, roughness, lacunarity, threshold and angle.
Result
An irregular map of marks and surface variation.
Use
Subtle wear and dirt, breaking up uniform sheen or adding marks to a product's surface.
Generators: Patterns

Regular motifs and starter pattern recipes. A generator provides a signal you can color, transform and use in different material channels.

Checkerboard

Inputs
Coordinates (2D vector).
Settings
Two colors, overall scale, X/Y scale and rotation.
Result
A regular colored checkerboard.
Use
Checks, alternating patterns or a clear check of UV scale and stretching.

Fibers

Inputs
No inputs; the pattern or value is created in this node.
Settings
Fibers 1 or Fibers 2; density, length, width, waviness, irregularity, angle and seed.
Result
Light and dark bands resembling fibers, as a single value map.
Use
Fine yarn or fuzz texture, or directional variation in height and roughness.

Value Gradient

Inputs
No inputs; the pattern or value is created in this node.
Settings
Linear, Diagonal, Square, Radial or Spherical mode; repetitions and either angle or center and radius, depending on the mode.
Result
A smooth distribution of values without a predefined color palette.
Use
A material transition mask, brightening part of a pattern or an input to Color Ramp.

Wave

Inputs
Coordinates (2D vector).
Settings
Stripes, Sine or Triangle; scale, angle and phase. Stripes also has width and softness.
Result
Repeating bands or waves as a value map.
Use
Stripes, ribbing and weave direction; combining two directions can also create checks.

Bricks

Inputs
No input ports; the layout is created within the generator.
Settings
Columns, rows, row offset, mortar gap and rounding.
Result
A map of repeating rectangular elements separated by gaps.
Use
Brick or tile patterns, regular segments and a mask of the gaps between them.

Tile Generator

Inputs
A ready-made graph without external inputs; internally: UV → Tile Coordinates → Simple Shape.
Settings
Open the graph to change grid columns, rows and seed, plus shape type, size and softness. The recipe has no separate quick sliders.
Result
A mask of a regularly repeating shape; the starter pattern consists of rectangular tiles with softened transitions.
Use
Regular dots, tiles and repeating motifs built from a simple shape.

Shape Splatter

Inputs
A ready-made graph without external inputs; internally: UV → Voronoi → Map Range.
Settings
Open the graph: Voronoi scale, randomness and seed, plus the mapping range, determine spot size and distribution.
Result
A map of scattered spots derived from Voronoi distance.
Use
Irregular dots, pores and spot masks. This recipe does not scatter arbitrary objects or images.

Weave

Inputs
A ready-made graph without external inputs; UV feeds two perpendicular Wave nodes combined with Maximum.
Settings
Open the graph to change both Wave nodes' parameters and how they are combined.
Result
A starter map of intersecting waves; one value output.
Use
A basis for a grid and directional structure to develop further. Complete cotton and knit graphs are separate material recipes.
Shapes and masks

Mathematical shapes and masks. A distance field describes position relative to an edge; a mask converts it into usable coverage.

Simple Shape (SDF)

Inputs
Coordinates (2D vector).
Settings
Circle, Ellipse, Rectangle, Gaussian Spot, Star, Polygon, Line, Segment or Ring. Depending on the shape: center, size, radius, endpoints, thickness, point or side count, rotation, softness and falloff.
Result
Two outputs: the Distance field and a ready-to-use Mask of the selected shape.
Use
Openings, dots, tiles, outlines and other pattern elements; the distance field can be combined further using SDF operations.

Segment Distance

Inputs
Coordinates (2D vector); start point (2D vector); end point (2D vector).
Settings
Start and end coordinates when their ports are not connected.
Result
The distance of each point from the segment.
Use
Drawing lines, threads and connectors; a subsequent Distance to Mask node can provide width and softness.

Combine Shapes

Inputs
A (value or value map); B (value or value map).
Settings
Union, Intersection, Subtract, Smooth Union, Smooth Intersection or Smooth Subtraction; A/B values and smoothness for smooth operations.
Result
A combined distance field ready to convert into a mask.
Use
Combining motifs, cutting holes and creating soft transitions between shapes.

Distance to Mask

Inputs
Distance field (value or value map).
Settings
Fill or Outline, edge softness, outline thickness and inversion.
Result
A value mask derived from a distance field.
Use
Converting mathematical geometry into a filled motif, contour or transparency mask.
Coordinates and transforms

Coordinates determine where a pattern is sampled. These nodes arrange repetitions, change position and distort textures.

UV Coordinates

Inputs
No inputs; the pattern or value is created in this node.
Settings
No additional parameters.
Result
A UV coordinate vector and separate X and Y values.
Use
A shared coordinate system for multiple generators and a starting point for your own pattern.

Tile Coordinates

Inputs
Coordinates (2D vector).
Settings
Column and row counts, and seed.
Result
Local and centered coordinates within a tile, the cell index and its random value.
Use
Repeating a small motif in a grid and varying individual cells independently.

Combine X/Y

Inputs
X (value or value map); Y (value or value map).
Settings
X and Y values when their ports are not connected.
Result
A vector composed of two values.
Use
Building custom coordinates, offsets and points for subsequent nodes.

Separate X/Y

Inputs
Vector (2D vector).
Settings
No additional parameters.
Result
Two separate X and Y values from the input vector.
Use
Independent axis processing, horizontal and vertical masks, and position-dependent calculations.

2D Transform

Inputs
Input signal (type matched to the connection).
Settings
X/Y scale, X/Y offset and rotation.
Result
A scaled, shifted or rotated pattern or coordinates.
Use
Adjusting a motif's size and direction without rebuilding its generator.

Warp

Inputs
Input signal (type matched to the connection); distortion map (value or value map).
Settings
Distortion strength and angle.
Result
The input pattern deformed according to the Distortion map.
Use
Wavy threads, irregular bands and organic deviations in a regular pattern.
Math and logic

Calculations on numbers, vectors and entire maps. Use them to control the pattern and build masks and relationships between its parts.

Constant Value

Inputs
No inputs; the pattern or value is created in this node.
Settings
One constant value.
Result
The same number throughout the texture area.
Use
Constant roughness or metallic, or a shared parameter for several connections.

Math

Inputs
A (value or value map); B (value or value map).
Settings
Multiply, Add, Subtract, Divide, Power, Absolute, Sine, Cosine, Modulo, Floor, Smoothstep, Compare, Less Than, Greater Than, Minimum or Maximum. A/B values, Epsilon for Smoothstep and Compare, and Clamp 0-1.
Result
The result of a calculation on values or entire value maps.
Use
Scaling effect strength, combining height, periodic repetitions and mask thresholding.

Vector Math

Inputs
A (2D vector); B (2D vector); scale (value or value map).
Settings
Add, Subtract, Multiply, Divide, Scale, Rotate, Normalize, Floor, Ceil, Fraction, Absolute, Minimum, Maximum, Length, Distance, Dot Product or Angle. A/B components and scale or angle for the relevant operation.
Result
Vector and numeric outputs, useful depending on the operation.
Use
Custom coordinate systems, cell offsets, rotations and distance calculations.

Compare

Inputs
A (value or value map); B (value or value map).
Settings
Equal, Not Equal, Less Than, Less Than or Equal, Greater Than or Greater Than or Equal; A/B values and Epsilon.
Result
A mask representing the comparison of two values.
Use
Selecting pattern areas by threshold, separating cells and creating conditions for subsequent blending.

Smoothstep

Inputs
Value (value or value map); first edge (value or value map); second edge (value or value map).
Settings
Value, Edge 0 and Edge 1 when not connected.
Result
A smooth transition between zero and one within a specified interval.
Use
Soft spot boundaries, smoothed masks and controlled effect falloff.

Map Range

Inputs
Input signal (value or value map); input minimum (value or value map); input maximum (value or value map); output minimum (value or value map); output maximum (value or value map).
Settings
Input and output minimums and maximums; Linear, Smoothstep or Smootherstep interpolation; Clamp option.
Result
A map remapped from one value range to another.
Use
Adapting noise to the required roughness, reversing a range or isolating a selected mask interval.

Cell Random

Inputs
Coordinates (2D vector).
Settings
Standard or Recipe Compatibility algorithm; X/Y period and seed.
Result
A repeatable pseudorandom value derived from cell coordinates.
Use
Different hues, offsets or effect strengths in successive tiles while preserving the same arrangement when reopening the graph.
Adjustments and filters

Adjustments to an existing signal: contrast, transition profile, color and detail softness.

Levels

Inputs
Input signal (value or value map).
Settings
Input black and white, Gamma, output black and white; histogram and range handles.
Result
A map with adjusted contrast and distribution of light and dark values.
Use
Isolating spots from noise, sharpening a mask and controlling relief height.

Curves

Inputs
Input signal (value or value map).
Settings
Curve point editor, adding and removing points, point X/Y; Smooth, Linear or Constant interpolation.
Result
A value map transformed according to the drawn curve.
Use
Precise control over bump profiles, midtones and transitions when a simple contrast adjustment is insufficient.

Brightness / Contrast

Inputs
Input signal (color).
Settings
Brightness, contrast and Factor controlling adjustment strength.
Result
Adjusted color.
Use
Brightening a pattern, making it more distinct or reducing contrast before blending.

Hue / Saturation

Inputs
Input signal (color).
Settings
Hue, saturation, value and Factor controlling adjustment strength.
Result
Color with adjusted hue, saturation or brightness.
Use
Creating color variants from the same graph.

Invert

Inputs
Input signal (color).
Settings
Factor controlling inversion strength.
Result
Inverted color components; inverting a grayscale map swaps light and dark areas.
Use
Swapping a mask and its background or obtaining the opposite effect from an existing signal.

RGB to Grayscale

Inputs
Color (color).
Settings
No additional parameters.
Result
A single brightness value derived from color.
Use
Using a colored pattern as a mask, height or a signal for value adjustments.

Blur

Inputs
Input signal (value or value map).
Settings
Radius and sample count.
Result
A blurred value map.
Use
Softening a mask, removing very fine detail or creating smoother height transitions.
Color and composition

Assigning colors, blending layers and controlling transparency.

Constant Color

Inputs
No inputs; the pattern or value is created in this node.
Settings
Color selection.
Result
A uniform color throughout the area.
Use
A base color or one of the blending components.

Color Ramp

Inputs
Factor - mask or coefficient (value or value map).
Settings
Gradient stop colors and positions; Linear, Constant or Ease interpolation.
Result
Color assigned to the input value according to the palette.
Use
Coloring noise, spots, weaves and other value maps.

Blend

Inputs
Factor - mask or coefficient (value or value map); A (color); B (color).
Settings
Normal, Multiply, Overlay, Screen, Add, Subtract or Difference mode; Opacity.
Result
Two colors or patterns combined using the Factor mask.
Use
Overlaying spots on a material, combining a pattern with its base color and changing a surface locally.

Set Alpha

Inputs
Input signal (alpha-capable signal); alpha (value or value map).
Settings
Replace or Multiply, and constant alpha when the Alpha port is not connected.
Result
A signal with assigned or modified transparency.
Use
Introducing cutouts and openings into a pattern and controlling its coverage.
PBR maps

Converting height into maps that affect the lighting of fine material detail.

Normal from Height

Inputs
Height map (value or value map).
Settings
Intensity, detail, X/Y repetitions and Y inversion.
Result
A normal map calculated from height differences.
Use
Lighting fine fibers, pores and embossing on a material. The effect changes the surface's appearance without adding model geometry.

AO from Height

Inputs
Height map (value or value map).
Settings
Horizon: radius, samples and bias; Local Average: response and depth. Strength in both modes.
Result
A local shading map calculated from the height map.
Use
Emphasizing weave recesses or grainy texture; the result describes material detail, not light occlusion from the whole scene.
Material output

The final connection between the graph and PBR material channels.

Material Output

Inputs
Base color (color); roughness (value or value map); metallic (value or value map); normals (normal map); AO (value or value map); opacity (value or value map); emission (color).
Settings
Channel connections; strengths for selected maps are available in material preview settings.
Result
The final material from Base Color, Roughness, Metallic, Normal, AO, Opacity and Emissive channels.
Use
Completing the graph and combining its outputs into the material visible on the model. There is no displacement input here that changes the mesh.
Ready-made graphs: Cotton fabrics

Editable material recipes with connected nodes and quick settings. Open a graph to change its structure as well.

Cotton - fine herringbone

Inputs
A complete, connected material graph; no preceding pattern needs to be connected.
Settings
Warp color, Weft color, Weave scale, Weave contrast, Fiber irregularity, Roughness, Normal map strength, Ambient Occlusion strength. Individual nodes remain editable when you open the graph.
Result
A fine, seamless cotton herringbone weave. The graph prepares color, roughness, Normal and AO maps.
Use
Subtle herringbone on clothing, bags and upholstered product parts.

Cotton - basket weave

Inputs
A complete, connected material graph; no preceding pattern needs to be connected.
Settings
Warp color, Weft color, Weave scale, Weave contrast, Fiber irregularity, Roughness, Normal map strength, Ambient Occlusion strength. Individual nodes remain editable when you open the graph.
Result
A cotton 2 × 2 basket weave with a pronounced structure. The graph prepares color, roughness, Normal and AO maps.
Use
A more distinct texture for fabrics, cloth bags and coverings.

Cotton - twill

Inputs
A complete, connected material graph; no preceding pattern needs to be connected.
Settings
Warp color, Weft color, Weave scale, Weave contrast, Fiber irregularity, Roughness, Normal map strength, Ambient Occlusion strength. Individual nodes remain editable when you open the graph.
Result
A cotton 2 × 2 twill weave with a regular diagonal. The graph prepares color, roughness, Normal and AO maps.
Use
Fabric with a visible diagonal direction, for example for clothing and accessories.

Cotton - plain weave

Inputs
A complete, connected material graph; no preceding pattern needs to be connected.
Settings
Warp color, Weft color, Weave scale, Weave contrast, Fiber irregularity, Roughness, Normal map strength, Ambient Occlusion strength. Individual nodes remain editable when you open the graph.
Result
A classic cotton 1 × 1 plain weave. The graph prepares color, roughness, Normal and AO maps.
Use
General-purpose fine cotton, canvas bags and simple woven fabrics.

Cotton - satin weave

Inputs
A complete, connected material graph; no preceding pattern needs to be connected.
Settings
Warp color, Weft color, Weave scale, Weave contrast, Fiber irregularity, Roughness, Normal map strength, Ambient Occlusion strength. Individual nodes remain editable when you open the graph.
Result
A smoother cotton 5-thread satin weave. The graph prepares color, roughness, Normal and AO maps.
Use
Smoother fabric with a subtler weave structure.
Ready-made graphs: Denim

Editable material recipes with connected nodes and quick settings. Open a graph to change its structure as well.

Jeans - classic 3 × 1 denim

Inputs
A complete, connected material graph; no preceding pattern needs to be connected.
Settings
Warp color, Weft color, Weave scale, Weave contrast, Fiber irregularity, Roughness, Normal map strength, Ambient Occlusion strength. Individual nodes remain editable when you open the graph.
Result
Classic 3 × 1 denim with an indigo warp, light weft and subtle fiber irregularity. The graph prepares color, roughness, Normal and AO maps.
Use
Jeans, jackets and accessories with a characteristic twill weave.
Ready-made graphs: Knits

Editable material recipes with connected nodes and quick settings. Open a graph to change its structure as well.

Cotton - jersey knit (T-shirt)

Inputs
A complete, connected material graph; no preceding pattern needs to be connected.
Settings
Yarn color, Recess color, Stitch scale, Stitch contrast, Fiber irregularity, Roughness, Normal map strength, Ambient Occlusion strength. Individual nodes remain editable when you open the graph.
Result
A fine cotton jersey knit with vertical columns of T-shirt stitches. The graph prepares color, roughness, Normal and AO maps.
Use
T-shirts and other fine jersey-knit surfaces.

1×1 rib knit

Inputs
A complete, connected material graph; no preceding pattern needs to be connected.
Settings
Yarn color, Recess color, Stitch scale, Stitch contrast, Fiber irregularity, Roughness, Normal map strength, Ambient Occlusion strength. Individual nodes remain editable when you open the graph.
Result
A fine, seamless 1×1 rib knit with vertical stitch columns for collars, cuffs and waistbands. The graph prepares color, roughness, Normal and AO maps.
Use
Collars, cuffs and garment waistbands.

Knit - sweater (V stitches)

Inputs
A complete, connected material graph; no preceding pattern needs to be connected.
Settings
Yarn color, Recess color, Stitch scale, Stitch contrast, Fiber irregularity, Roughness, Normal map strength, Ambient Occlusion strength. Individual nodes remain editable when you open the graph.
Result
A full-bodied sweater knit with regular V stitches. The graph prepares color, roughness, Normal and AO maps.
Use
Sweaters and other products with pronounced V-shaped stitches.
Ready-made graphs: Meshes and openwork

Editable material recipes with connected nodes and quick settings. Open a graph to change its structure as well.

Mesh

Inputs
A complete, connected material graph; no preceding pattern needs to be connected.
Settings
Yarn color, Recess color, Stitch scale, Stitch contrast, Fiber irregularity, Roughness, Normal map strength, Ambient Occlusion strength. Individual nodes remain editable when you open the graph.
Result
A seamless fabric mesh with regular diamond-shaped openings and transparent gaps in the opacity channel. The graph prepares color, roughness, Normal and AO maps. The Opacity mask creates the transparent openings.
Use
See-through mesh panels for clothing, bags and accessories.
Ready-made graphs: Technical materials

Editable material recipes with connected nodes and quick settings. Open a graph to change its structure as well.

Polyester - micromesh (birdseye)

Inputs
A complete, connected material graph; no preceding pattern needs to be connected.
Settings
Yarn color, Recess color, Stitch scale, Stitch contrast, Fiber irregularity, Roughness, Normal map strength, Ambient Occlusion strength. Individual nodes remain editable when you open the graph.
Result
A fine polyester sports knit with birdseye stitches. The graph prepares color, roughness, Normal and AO maps.
Use
Sportswear and technical panels with a fine birdseye structure.

Velcro - hook rows

Inputs
A complete, connected material graph; no preceding pattern needs to be connected.
Settings
Base color, Hook or loop color, Pattern density, Fiber contrast, Fiber irregularity, Roughness, Normal map strength, Ambient Occlusion strength. Individual nodes remain editable when you open the graph.
Result
Rows of nylon Velcro hooks intended for lightweight, alpha-masked planes. The graph prepares color, roughness, Normal and AO maps. The Opacity mask cuts out the spaces between hooks.
Use
The hook side of a fastener on a prepared plane with transparency; the material does not model the fastener itself.

Velcro - loops

Inputs
A complete, connected material graph; no preceding pattern needs to be connected.
Settings
Base color, Hook or loop color, Pattern density, Fiber contrast, Fiber irregularity, Roughness, Normal map strength, Ambient Occlusion strength. Individual nodes remain editable when you open the graph.
Result
A dense, fine, full-surface pile for the loop side of Velcro, without an opacity mask. The graph prepares color, roughness, Normal and AO maps.
Use
A solid loop side of a fastener with a fine, dense texture.
Ready-made graphs: Leathers

Editable material recipes with connected nodes and quick settings. Open a graph to change its structure as well.

Leather - smooth grain

Inputs
A complete, connected material graph; no preceding pattern needs to be connected.
Settings
Main color, Structure color, Structure scale, Structure contrast, Structure irregularity, Roughness, Normal map strength, Ambient Occlusion strength. Individual nodes remain editable when you open the graph.
Result
Smooth grain leather with a subtle, natural grain. The graph prepares color, roughness, Normal and AO maps.
Use
Leather bags, straps and smooth product panels.

Leather - nubuck

Inputs
A complete, connected material graph; no preceding pattern needs to be connected.
Settings
Main color, Structure color, Structure scale, Structure contrast, Structure irregularity, Roughness, Normal map strength, Ambient Occlusion strength. Individual nodes remain editable when you open the graph.
Result
Matte nubuck with a fine, even surface nap. The graph prepares color, roughness, Normal and AO maps.
Use
A matte nubuck surface with a very fine nap.

Leather - suede (velour)

Inputs
A complete, connected material graph; no preceding pattern needs to be connected.
Settings
Main color, Structure color, Structure scale, Structure contrast, Structure irregularity, Roughness, Normal map strength, Ambient Occlusion strength. Individual nodes remain editable when you open the graph.
Result
Soft suede or velour with a dense, directional nap. The graph prepares color, roughness, Normal and AO maps.
Use
Suede areas of footwear, bags and clothing.

Leather - patent

Inputs
A complete, connected material graph; no preceding pattern needs to be connected.
Settings
Main color, Structure color, Structure scale, Structure contrast, Structure irregularity, Roughness, Normal map strength, Ambient Occlusion strength. Individual nodes remain editable when you open the graph.
Result
Patent leather with a very smooth, glossy coating. The graph prepares color, roughness, Normal and AO maps.
Use
Glossy accessories and patent leather surfaces.
Ready-made graphs: Towels

Editable material recipes with connected nodes and quick settings. Open a graph to change its structure as well.

Towel - terry (looped)

Inputs
A complete, connected material graph; no preceding pattern needs to be connected.
Settings
Fiber color, Recess color, Structure scale, Structure contrast, Fiber irregularity, Roughness, Normal map strength, Ambient Occlusion strength. Individual nodes remain editable when you open the graph.
Result
Toweling fabric with dense terry loops. The graph prepares color, roughness, Normal and AO maps.
Use
Towel and bathrobe surfaces with visible loop detail.

Towel - waffle weave

Inputs
A complete, connected material graph; no preceding pattern needs to be connected.
Settings
Fiber color, Recess color, Structure scale, Structure contrast, Fiber irregularity, Roughness, Normal map strength, Ambient Occlusion strength. Individual nodes remain editable when you open the graph.
Result
A towel with a cellular waffle weave and a raised grid. The graph prepares color, roughness, Normal and AO maps.
Use
Towels and textiles with a characteristic waffle structure.
Ready-made graphs: Carpets

Editable material recipes with connected nodes and quick settings. Open a graph to change its structure as well.

Carpet - loop pile (bouclé)

Inputs
A complete, connected material graph; no preceding pattern needs to be connected.
Settings
Fiber color, Recess color, Structure scale, Structure contrast, Fiber irregularity, Roughness, Normal map strength, Ambient Occlusion strength. Individual nodes remain editable when you open the graph.
Result
Thick, irregular loops of bouclé carpet pile. The graph prepares color, roughness, Normal and AO maps.
Use
Carpet surfaces with a looped texture.

Carpet - cut pile (velour)

Inputs
A complete, connected material graph; no preceding pattern needs to be connected.
Settings
Fiber color, Recess color, Structure scale, Structure contrast, Fiber irregularity, Roughness, Normal map strength, Ambient Occlusion strength. Individual nodes remain editable when you open the graph.
Result
Dense, soft cut carpet pile with a velour finish. The graph prepares color, roughness, Normal and AO maps.
Use
Carpets and floor coverings with a dense, velvety appearance.
Ready-made graphs: Surface imperfections

Editable material recipes with connected nodes and quick settings. Open a graph to change its structure as well.

Wrinkles - subtle

Inputs
A complete, connected material graph; no preceding pattern needs to be connected.
Settings
Highlight color, Shadow color, Effect scale, Effect contrast, Effect irregularity, Roughness, Normal map strength, Ambient Occlusion strength. Individual nodes remain editable when you open the graph.
Result
Soft, seamless fabric wrinkles with subtle relief, shading and roughness variation. The graph prepares color, roughness, Normal and AO maps.
Use
Visual wrinkle detail and variation in the Normal map or roughness. Large model folds require geometry editing or simulation.

Spots - subtle tonal

Inputs
A complete, connected material graph; no preceding pattern needs to be connected.
Settings
Highlight color, Shadow color, Effect scale, Effect contrast, Effect irregularity, Roughness, Normal map strength, Ambient Occlusion strength. Individual nodes remain editable when you open the graph.
Result
Irregular, low-contrast tonal spots that break up perfectly uniform material color and sheen. The graph prepares color, roughness, Normal and AO maps.
Use
Subtle spots that vary uniform color and sheen, also useful as a starting point for your own effects.

Example: one structure, multiple channels

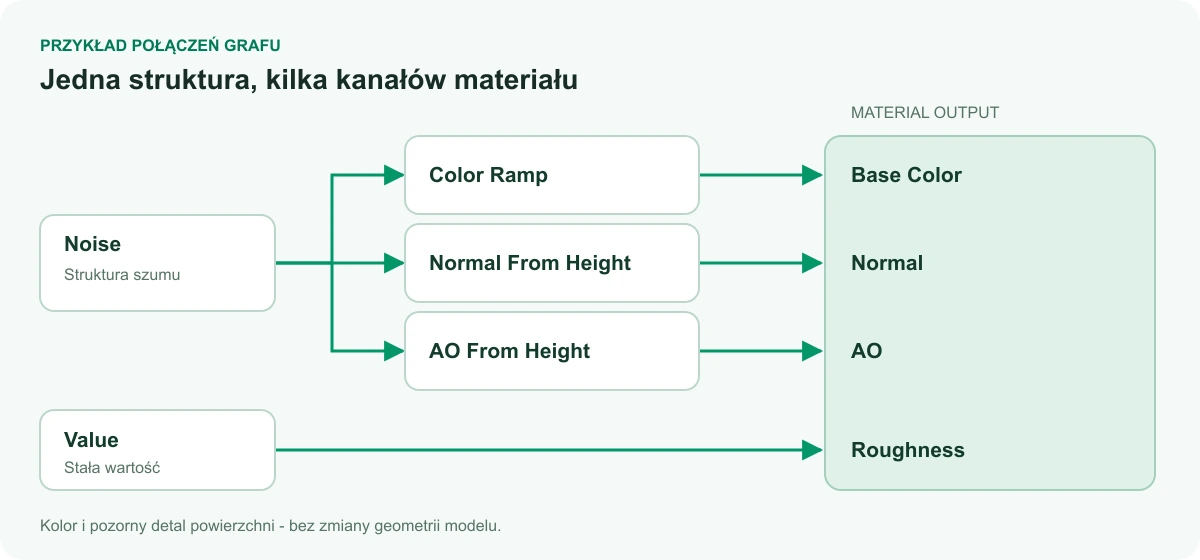
The same noise texture can provide color, fine relief and local shading. The diagram below shows example connections you can build in the editor.

  • Noise → Color Ramp → Base Color: assign colors to the structure's light and dark areas.
  • Noise → Normal From Height → Normal: use the structure for apparent surface relief.
  • Noise → AO From Height → AO: emphasize local recesses.
  • Value → Roughness: set material roughness independently of color.
Connection diagram: Noise through Color Ramp to Base Color, through Normal From Height to Normal, and through AO From Height to AO; Value to Roughness.
An example educational connection diagram, not an interface screenshot. The same structural data can feed several material channels.

Connect and control material channels

Drag a connection from a node's output to a compatible input on the next node. One output can feed several nodes. Each input uses one source; a new connection replaces the previous one.

  • Values and colors can be converted automatically between each other. Vector coordinates and normal maps require the appropriate port types.
  • Material Output collects seven channels: Base Color, Roughness, Metallic, Normal, AO, Opacity and Emissive. There is one such node in the graph.
  • Use fit-to-view and automatic layout to organize a larger graph. You can select, duplicate and delete nodes, and undo changes.
  • For repeating patterns, check continuity at tile boundaries. Changing angle or scale can break continuity even when an individual tile looks correct.

Saving, JSON import and node instructions for AI

Name your own pattern and save it in the Inspector document. You can use it on several scene layers; changing its definition refreshes layers that reference it. Export JSON preserves the graph for reuse, while Import JSON loads it into the editor and replaces the current graph.

Download AI instructions provides a JSON file containing the basic node catalog, inputs and outputs, parameters, allowed values and an example graph. Attach this file to your own AI tool and describe the material's appearance, colors, scale and intended effect. You can import the resulting graph and continue editing it in Alter Product.

The catalog in this guide also includes generators and ready-made recipes visible in the application's library. Downloading instructions exports a description; you make the AI request in your chosen tool. After importing, check every channel and pattern tiling in the preview.

Save the project, model and sewing patterns for further work

Saving the project preserves the ability to edit its construction. The GLB model and sewing patterns serve the next stages of design and production.

Keep the ability to edit further

Save the generator project to preserve patterns, scene settings and materials. In the application, use Save project to server or Save as new project; in the plugin, the project is stored locally in WordPress. Use the finished model and its revision in Product Designer.

Choose the appropriate file type

Use the model for subsequent designs and personalization. Sewing-pattern files let you continue working on construction and the prepared sizes.

Process outputs and their purposes
OutputHow to use it
3D GLB modelDownload the model for further work in 3D software such as Blender, or use it in an application supporting glTF/GLB. Choose the quality variant, textures and compression. Size export options depend on the available model family and geometry compatibility.
SVG / PDF sewing patternsIn Download → Pattern, choose parts, sizes and auxiliary layers. PDF preserves 1:1 scale; print at 100% without fitting to the page.
Sewing-pattern packageThe ZIP can contain separate size files, a size overlay and JSON project data.
Print filePrepare it in Designer's printing tools for print areas, including appropriately configured AOP designs. See the Print-ready files guide for details.

Open a GLB model in Blender and other 3D software

Import an exported GLB into Blender through File → Import → glTF 2.0 (.glb, .gltf). Continue working on the model and prepare your own scene, lighting and renders. The same file can be used in other software supporting this format.

  • To start, choose PNG textures embedded in the model and export without geometry compression. The model and material maps remain in a single GLB, and the importer will not need support for Draco or Meshopt compression extensions.
  • If you choose separate textures, preserve the resulting package's file structure. Select available geometry, texture and size variants in the export dialog.
  • GLB transfers the result of model preparation. Also keep sewing patterns, simulation settings and editable pattern graphs in the Product Generator project so you can return to them.